The procedure for removal of the uterus and ovaries is described below.
Opening the abdominal cavity
Firstly, identify the umbilicus. This is normally visible, but can be confirmed by drawing a line between the last ribs (these are palpable under the sterile drape); the umbilicus is slightly caudal to this line.
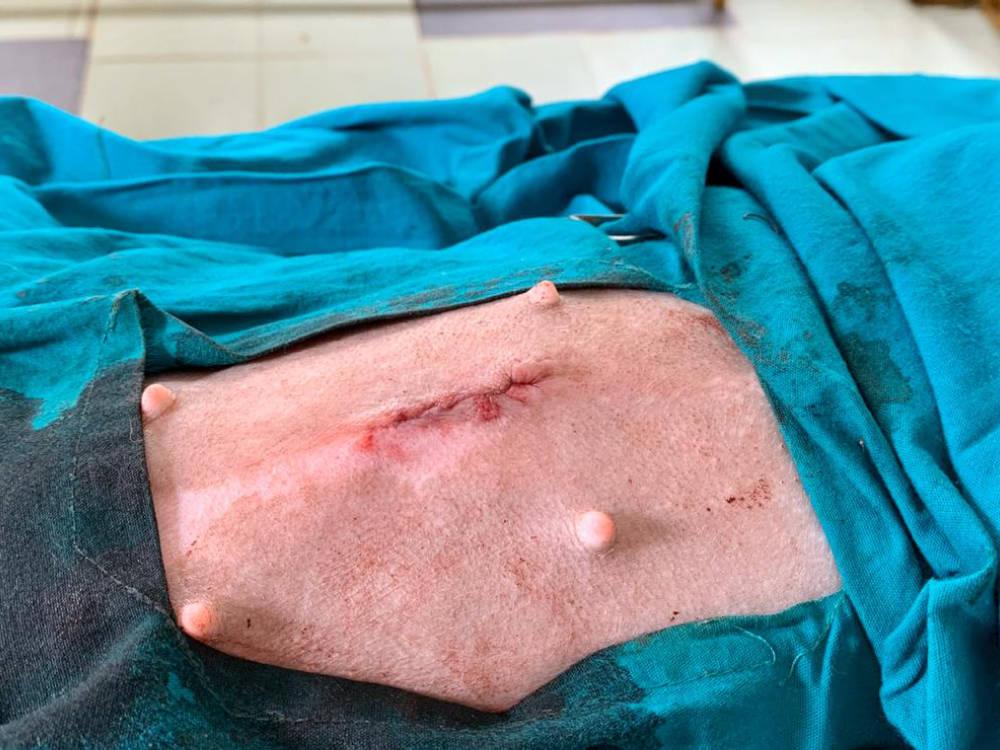
Incise the skin. Start your incision 1-2 fingers width caudal to the umbilicus. This location may need to be varied; for example, in pregnant or deep-chested dogs, it should be started more cranially. Extend the incision caudally (if you roughly divide the caudal abdomen into thirds, extend for the length of one third). This is around 5-7cm (2-3 inches) in a 15-20kg dog. Be bold with your first incision to create a single, clean entry point, and to avoid cutting the skin multiple times, creating unnecessary trauma.
Dissect through the subcutaneous tissue. You can use your fingers to stretch and bluntly dissect through the subcutaneous tissue (Figure 1). The goal is to expose the linea alba which is a fibrous, white line/band running along the midline.
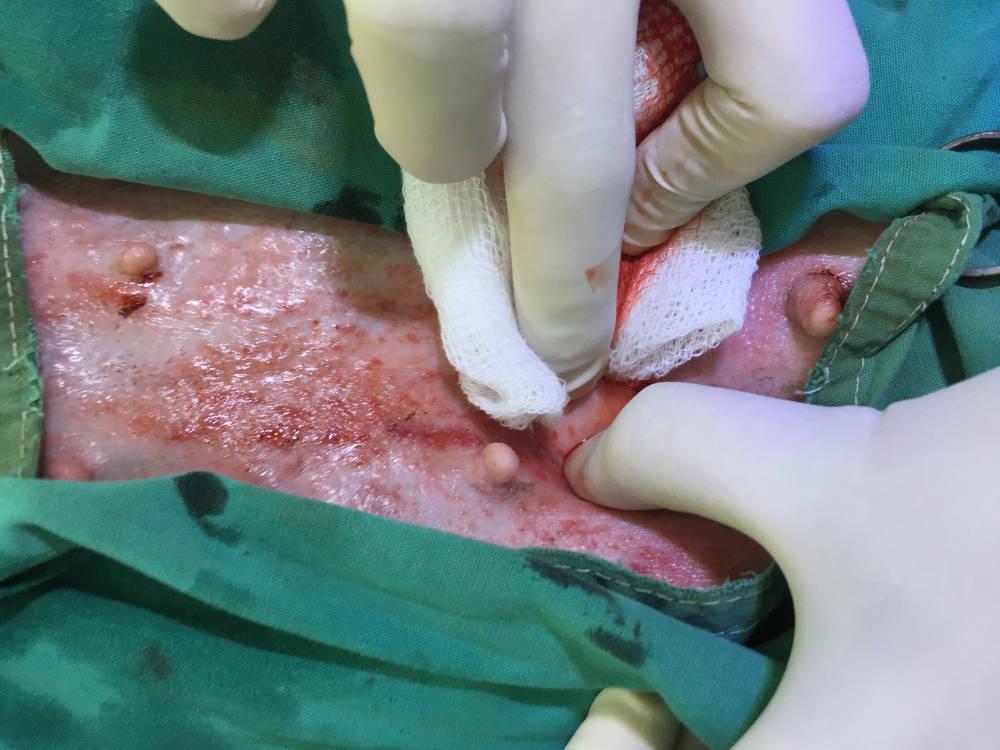
Blunt dissection using blunt scissors can help (Figure 2). However, avoid excessive dissection as this will result in the creation of dead space, which can potentially delay healing.
Approximately 7-10 mm of muscle around the linea alba should be made visible; this ensures that it can be easily identified and sutured correctly when the abdominal cavity is closed. If subcutaneous tissue is sutured instead of muscle due to poor visibility and identification of the muscle layer, this risks herniation of the abdominal contents and death.
In obese dogs, excess fat may need to be trimmed with scissors to expose the linea alba and muscle layer properly.
Identify the linea alba. The linea alba is identifiable as a visible, white, fibrous band from which abdominal muscles attached from either side (Figure 3). If it is not apparent, palpate the area; it will feel like a small, firm depression at the midline. Ensuring your patient is positioned straight on the table will ensure the skin mid-line and linea alba are aligned.
Incise the linea alba to enter the abdominal cavity. This next step must be performed carefully. Elevate the abdominal muscle with rat-tooth forceps so that the linea alba is held between the teeth of the forceps (figure 4).
The reason for elevating the muscle is to prevent injury from the blade to the underlying abdominal contents which can result in serious consequences for the patient.
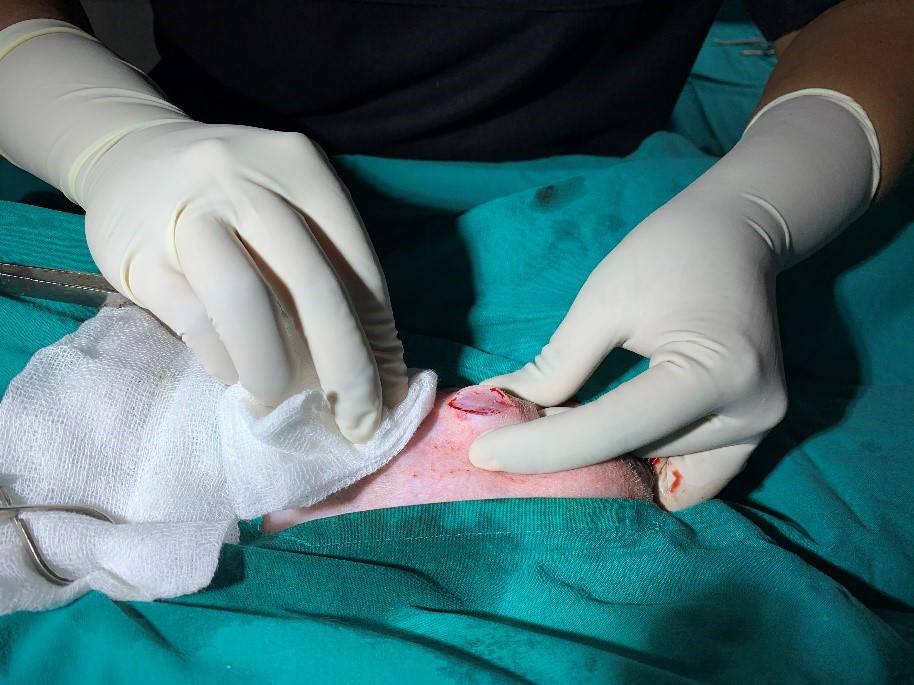
Hold your scalpel with the sharp-side facing upwards. Make a small stab incision through the linea alba into the abdominal cavity. The incision must be positioned correctly in the fibrous tissue directly and not in the muscle either side.
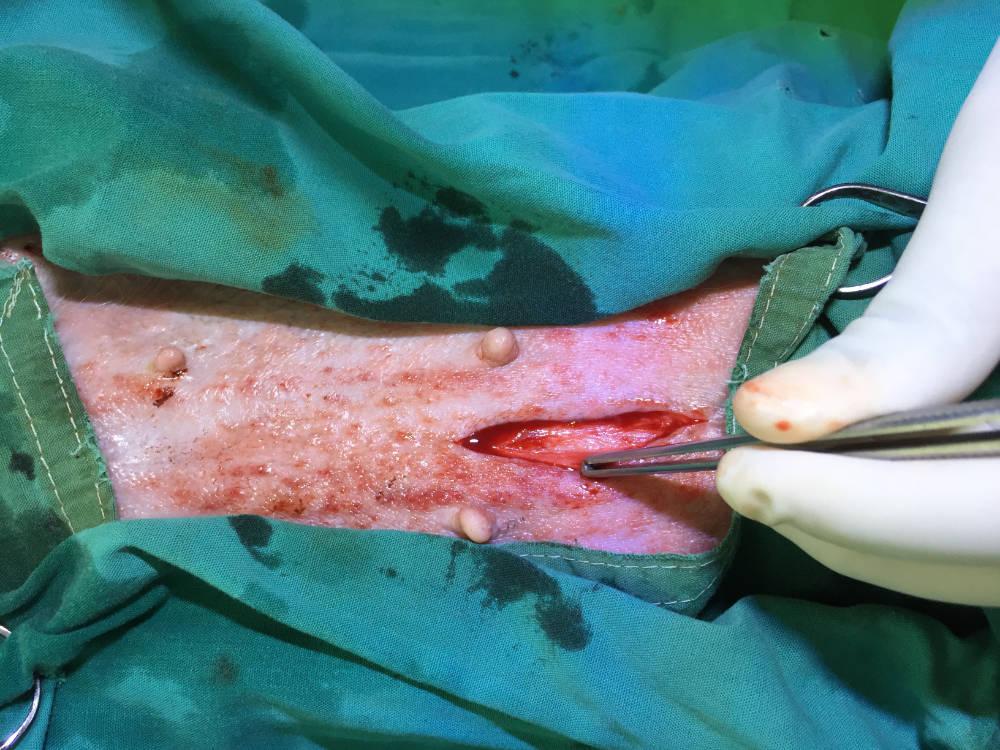
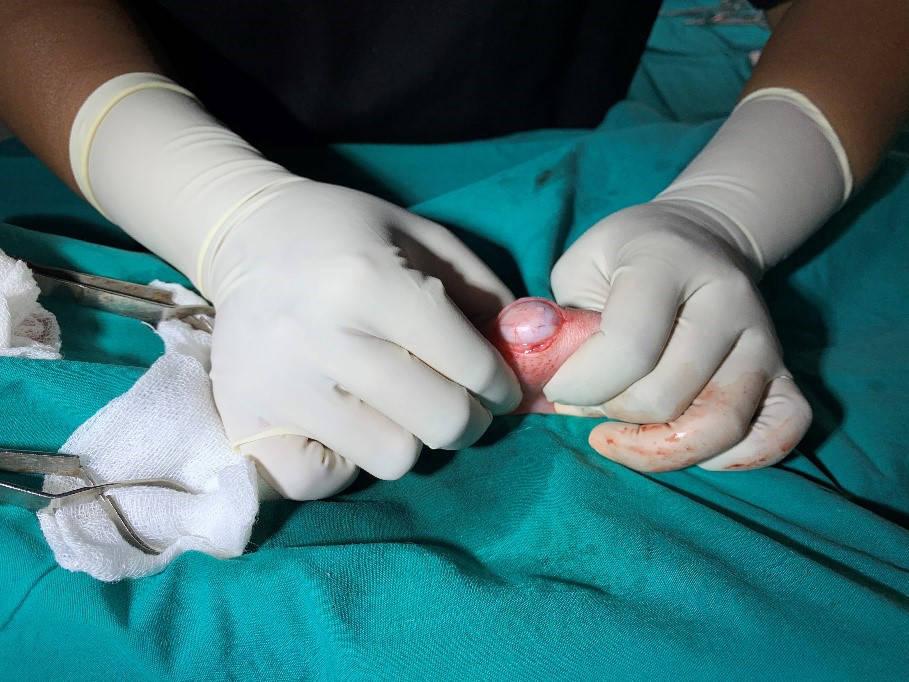
Once you feel the blade cut through the linea alba, check to see that you have incised through the peritoneum and into the abdominal cavity proper; failing to incise this thin layer is a common mistake. Gently pull out some omental fat with your thumb forceps to confirm this (Figure 5).
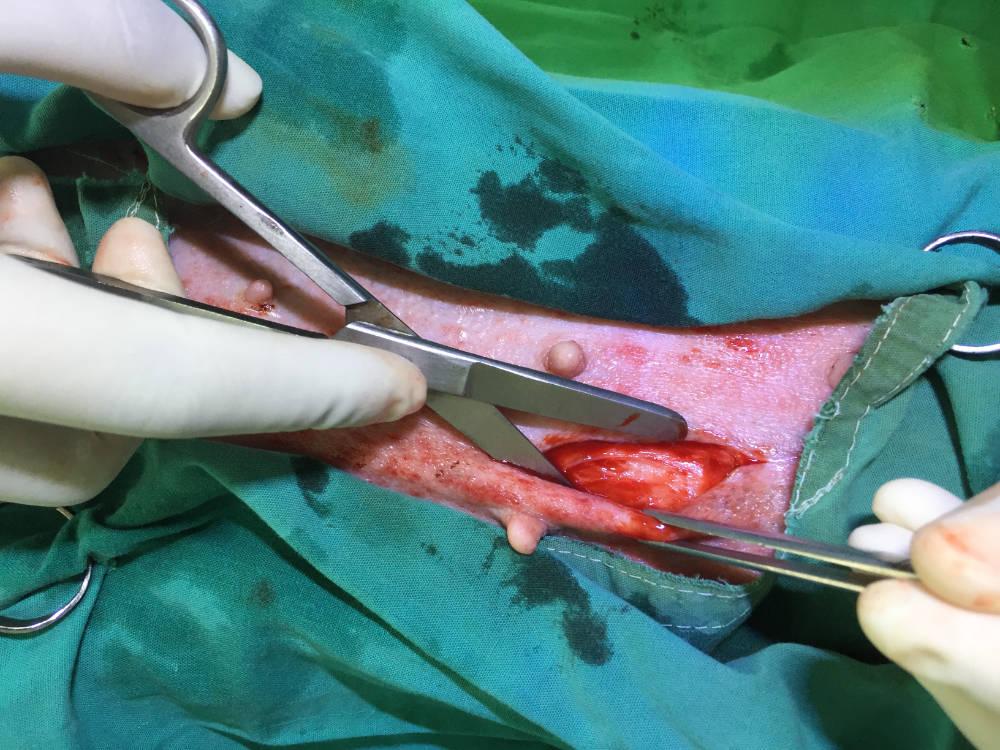
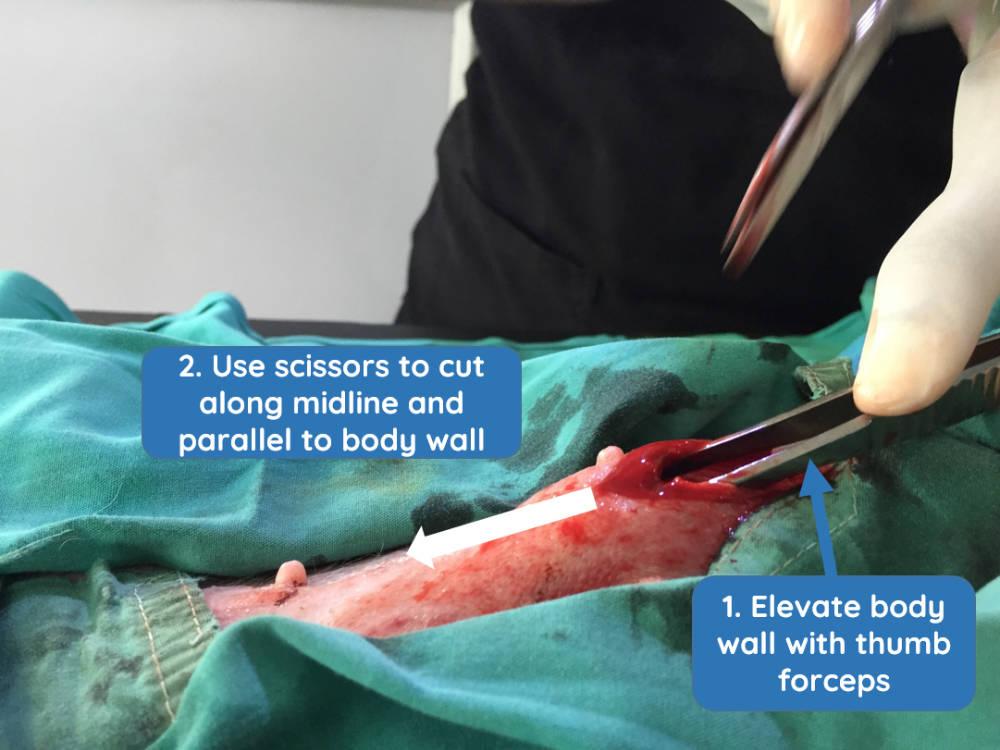
Extend your incision. After confirming that you have fully entered the abdominal cavity, increase the incision cranially and caudally using Mayo scissors. To do this, place the forceps under the abdominal wall, keeping them parallel to the incision site and lift them to elevate the muscle from the midline whilst cutting the tissue (Figure 6).
How large should I make my incision?
This depends on your experience and confidence. Remember, wounds heal from side to side and not lengthways, so a wound will heal at the same rate if it is short or long! A less experienced surgeon should extend their incision so that they can easily identify and access everything and easily ligate any bleeding vessels. Operating through a smaller incision requires greater surgical expertise and judgement, however has benefits in a high throughput setting. Once you become more experienced, you may wish to reduce your incision length, however this should always be done with careful consideration of the individual patient, the setting and each surgeon's own abilities.
Removing the uterus and ovaries
Identify the uterus and first ovary. Once you are in the abdominal cavity, locate a uterine horn. If the surgeon is standing with the dog's head to his/her left, it is usually easier to find the right horn. You can confirm that you have found the uterine horn by following it to the bifurcation, or the other way to the ovary. Identify the ovary.
Create a window in the broad ligament. We recommend creating a window in the broad ligament before stretching the suspensory ligament.
The window should be created in the non-fatty, avascular part of the broad ligament and not too close to the ovary.
Locate the suspensory ligament. The suspensory ligament can be stretched to give greater exposure to the ovarian pedicle. It is more appropriate to refer to 'stretching' rather than 'breaking' because, when performed correctly, nothing actually breaks.
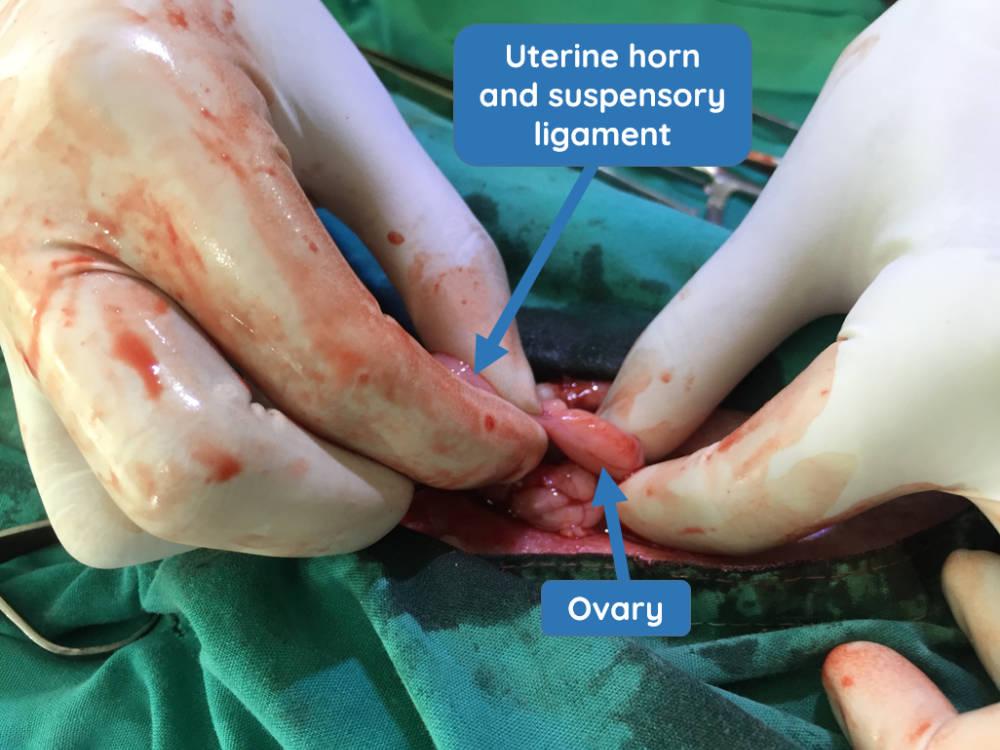
Locate the ovary and hold the ovarian bursa between your thumb and index finger. Whilst stabilising the ovary in this manner with your left hand, you will have the uterine horn and suspensory ligament all in a straight line (Figure 7) (or vice versa if you are left-handed). The suspensory ligament is a taut, fibrous band at the proximal edge of the ovarian pedicle.
Stretch the suspensory ligament. Use just the index finger of your right hand, whilst isolating the ovary separately, to apply gentle upward pressure only to the tight, 1-2mm wide, edge of the suspensory ligament. By continuing gentle pressure, you will feel the ligament stretch and eventually become loose from its base. This technique must be performed carefully and tension should never be applied directly to the ovarian pedicle, containing the ovarian artery. Stretching the ovarian ligament should not result in any bleeding and enables the ovary to be exteriorised more easily. Some institutions recommend careful transection of the suspensory ligament with scissors or diathermy.
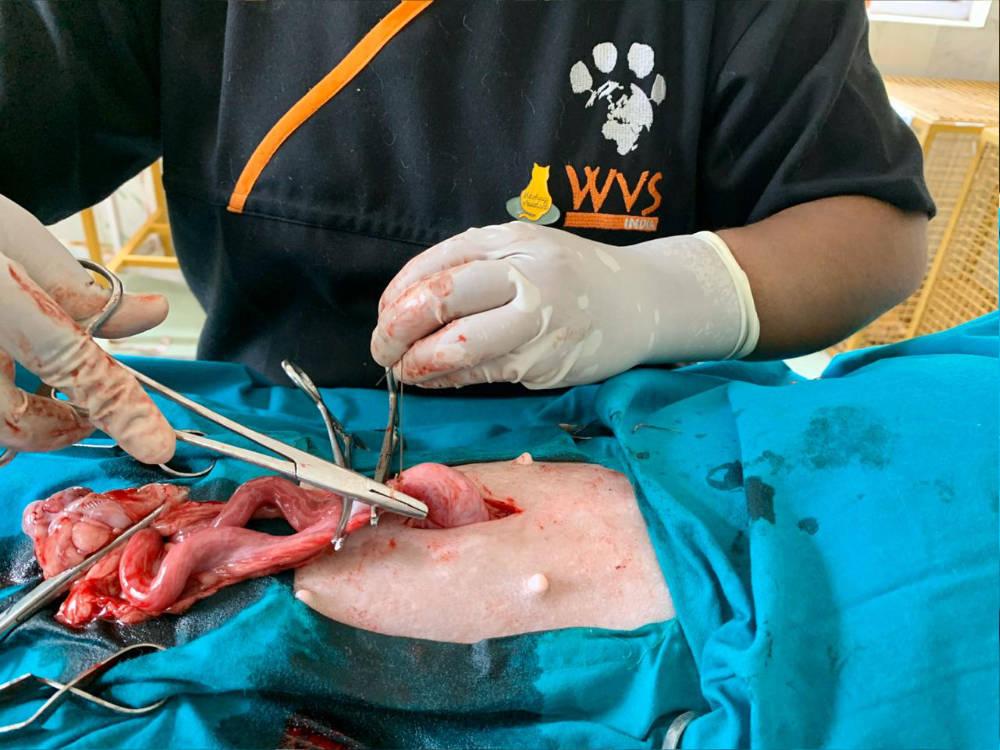
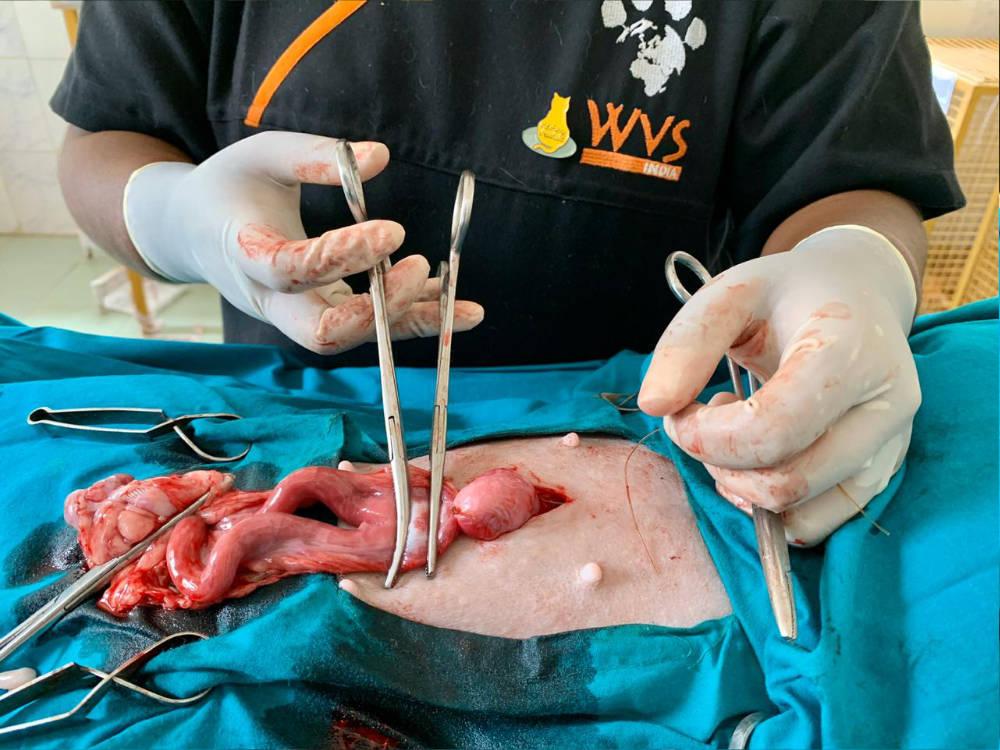
Ligate the ovarian pedicle. Place the first clamp (clamp 1) through the window that was created in the broad ligament, then across the ovarian pedicle below the ovary. Palpate the ovary to ensure it is above the clamp (Figure 8). Place a second clamp (clamp 2) approximately 5-10mm below the first. The first ligature should be placed one finger-width (approximately 10-15mm) below the clamp 2. If it is too close to the lower clamp 2, the ligature will not tighten or you risk transecting the pedicle as you tighten your ligature against the clamped tissue.
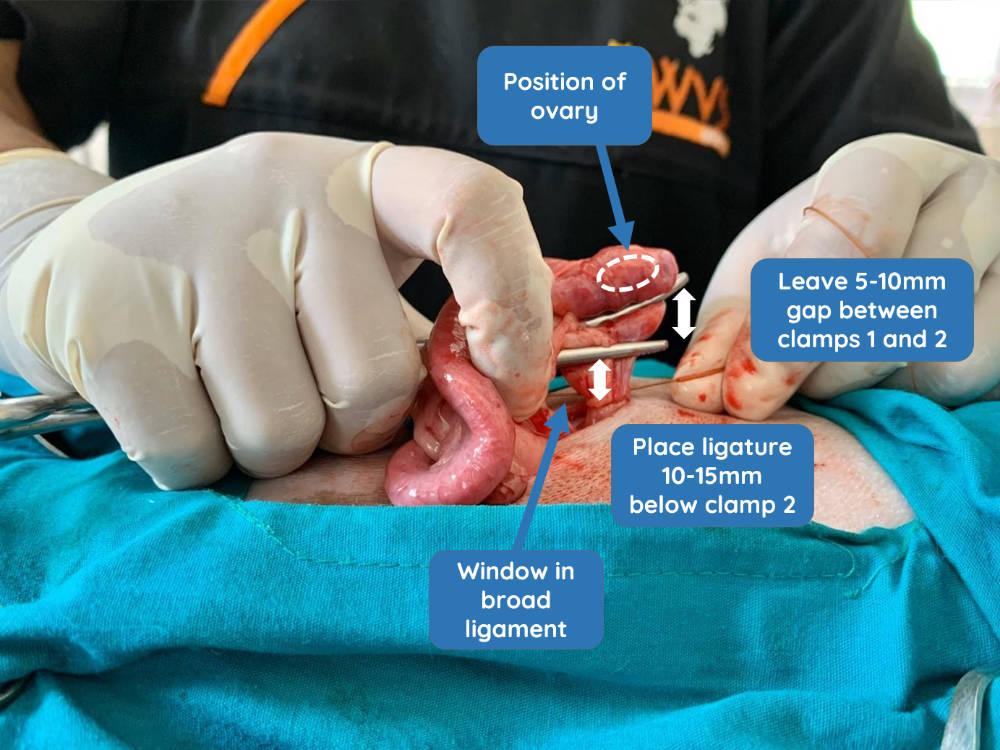
You must ensure that you have included all of the ovary when you clamp and that there is no remaining tissue left in the animal. Ovarian remnants are a considerable welfare concern, resulting in persistent oestrus and risk of stump pyometra. They can be challenging to surgically excise at a subsequent time and so the surgeon should pay particular attention to ensure the whole ovary is excised.
Hold the suture material with your fingers located near the knot, and other fingers holding the instruments and muscle to help you to visualise the ligature. At our ITCs, we routinely use 1-0 chromic catgut for ligations. Tie a square knot. Ensure that this is tied securely by applying continuous tension (and be careful not to break the suture material). Before placing the remaining throws, check that you do not have any omentum or other tissues caught in this first knot which will risk pulling the knot off the pedicle once released. An even tension must be maintained on both sides of the knot as each throw is tied, otherwise a slip knot will form instead.
Each ligature must have 6 knots. Ensure that they are made with equal care and that they are all straight, square knots. Haemorrhage from the ovarian pedicle will arise from a loose knot; if observation is poor, the surgeon may not be able to tighten the knot sufficiently, or fat/soft tissue becomes trapped, preventing it from tightening and holding in place. Manual dexterity in using your fingers to adequately visualise the ligature site, whist avoiding tension on the ovarian pedicle is a key skill in performing ovariohysterectomy.
Should I use a Millers knot?
As catgut is commonly used for ligatures in resource-limited setting, alternatives such as a Millers knot – even though a great technique - provides no additional benefit and can be more difficult to perform correctly because of catguts poor 'sliding' ability. However, the Millers knot is an excellent option when using alternative suture material, such as synthetic polyglactin 910.
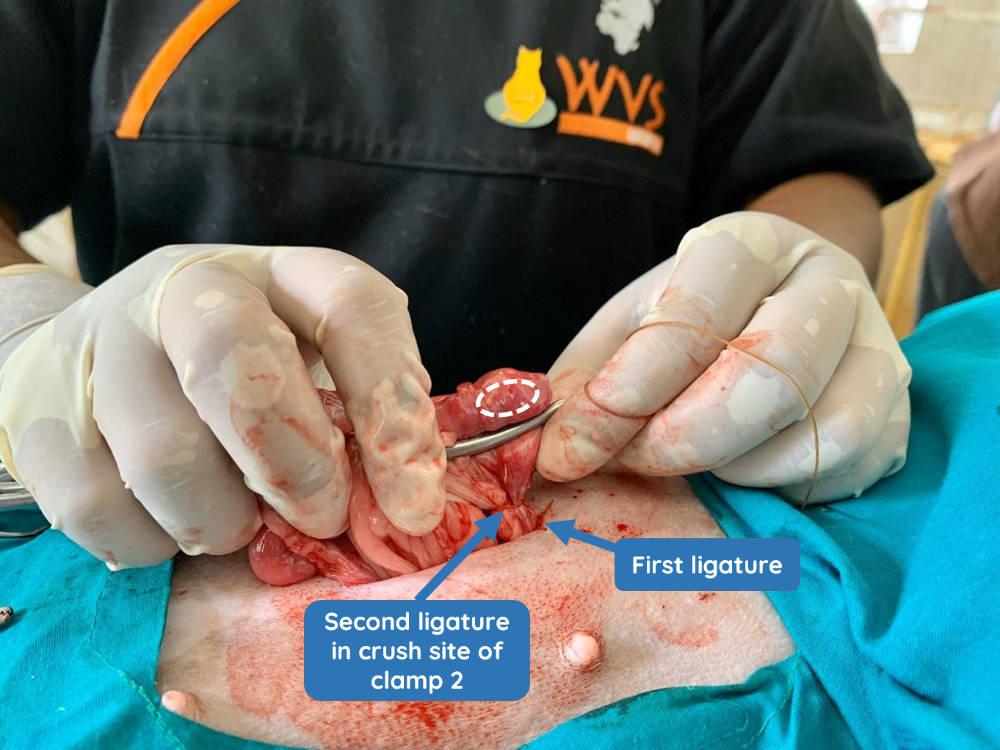
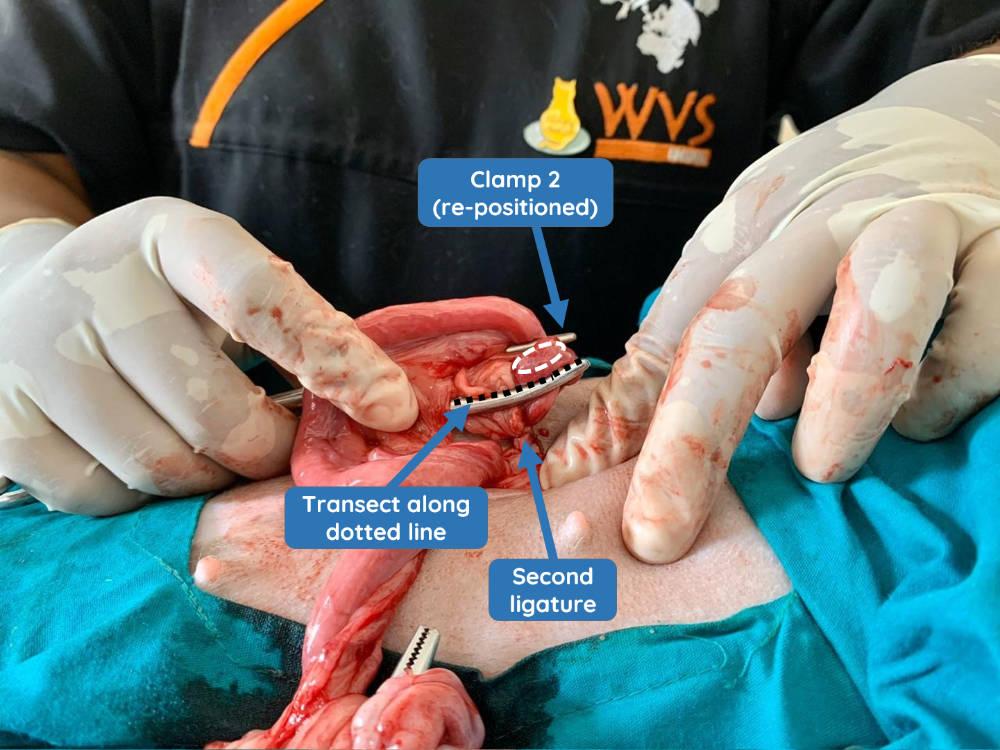
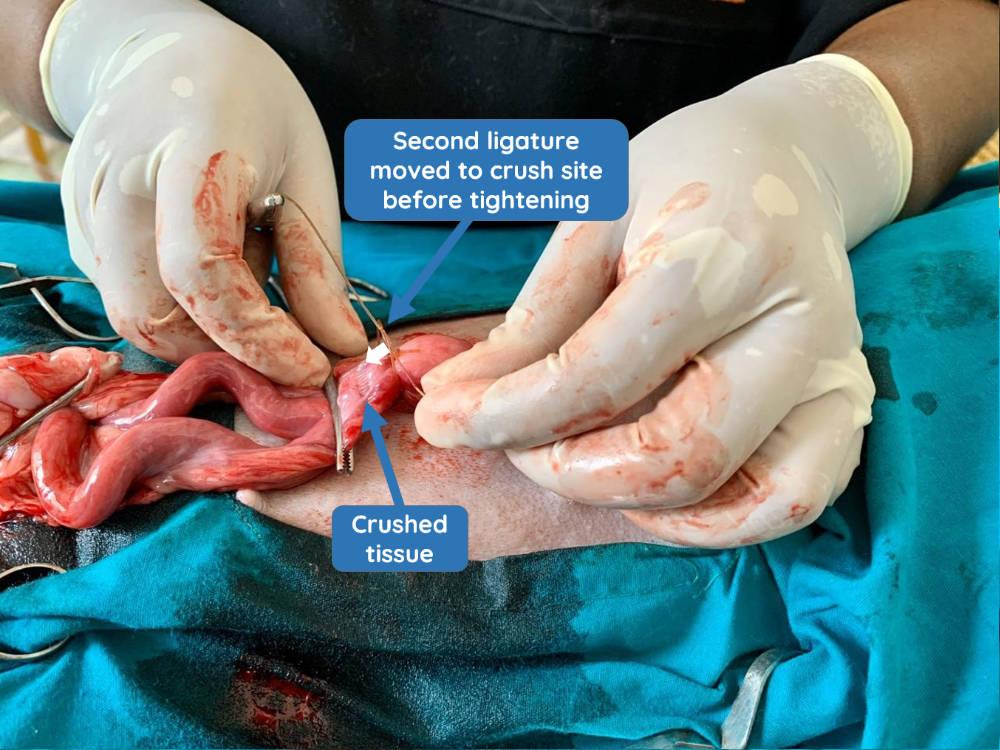
Remove the lower clamp 2 and either position it closer to the ovary above the second clamp or, alternatively, over the uterine horn on the other side of the ovary; which you choose will depend on the space available below the ovary. In the images below (Figures 9 and 10), it shows that this clamp has had to be positioned the other side of the ovary on the uterine horn, as there was not space above clamp 1 without risking clamping part of the ovary itself which must be avoided. The second ligature is then placed in the crush site (Figure 9). This may be an encircling or transfixing ligature (anchoring). Again, ensure that 6 secure knots are placed.
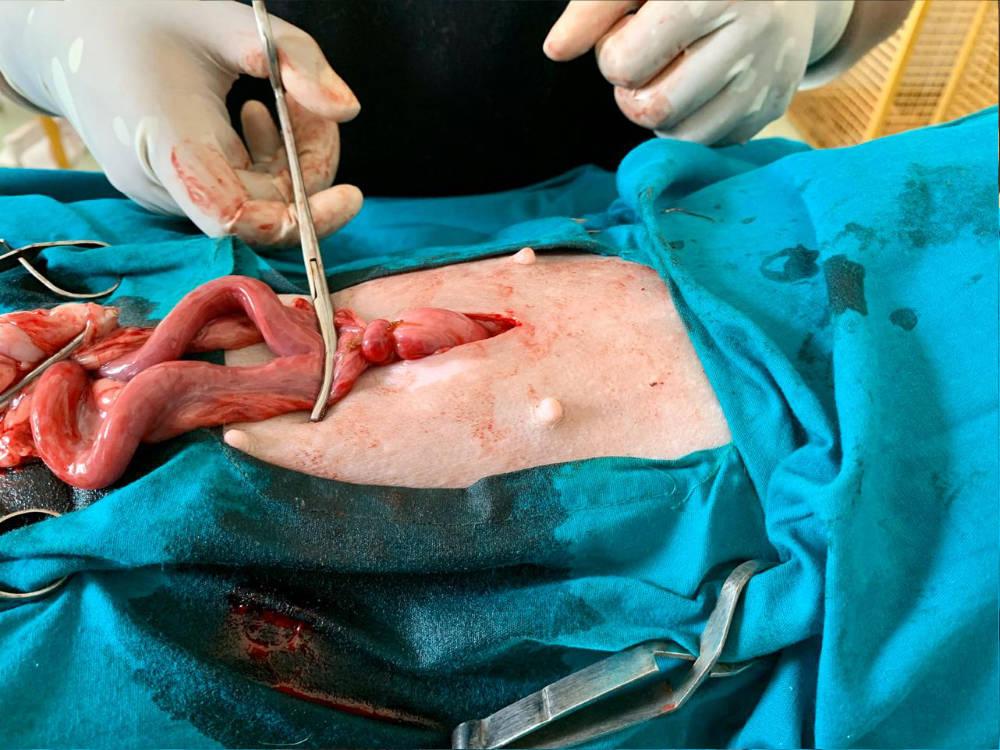
Transect the ovarian pedicle. Palpate the ovary and transect carefully the tissue below it, ensuring no remnants of ovarian tissue remain.
Inspect and release the ovarian pedicle. Firstly, take a clean, sterile swab and gently inspect the cavity deep below the ligatures to check for diffuse bleeding. This situation can arise due to:
- uncontrolled tearing of the suspensory ligament, and/or
- poor ligature placement which are too high.
After you have completed this, now have another inspection of the ligatures. Ask yourself: do they appear tight? Is the tissue being crushed sufficiently? Is there enough tissue after the last ligature to prevent it from slipping?
Only after these have been checked should you take the rat-toothed forceps and hold the stump above your last ligature - do not grasp the ligature itself (Figure 11). Gently release the artery forceps holding the stump, and check for bleeding at the stump. Once you are satisfied, gently return the ovarian pedicle stump into the abdomen.

Repeat this procedure for the second ovary. The process for the second ovary is identical.
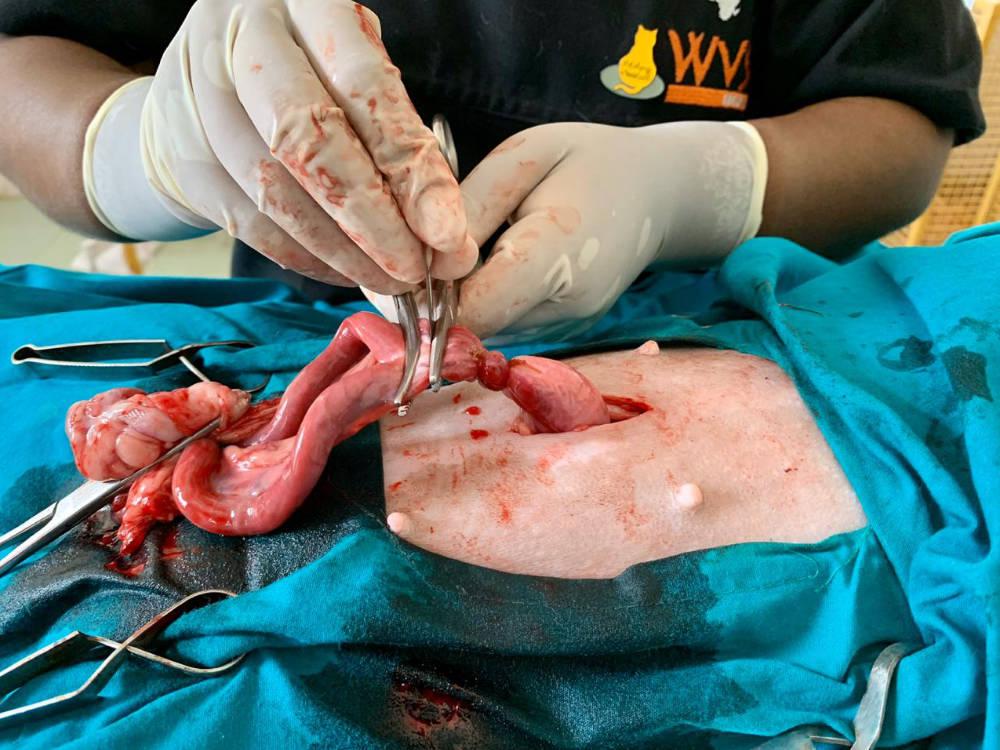
Locate and ligate the uterine body. To do this, follow a uterine horn to the bifurcation. Place your clamps on the uterine body close to the cervix (Figure 12).
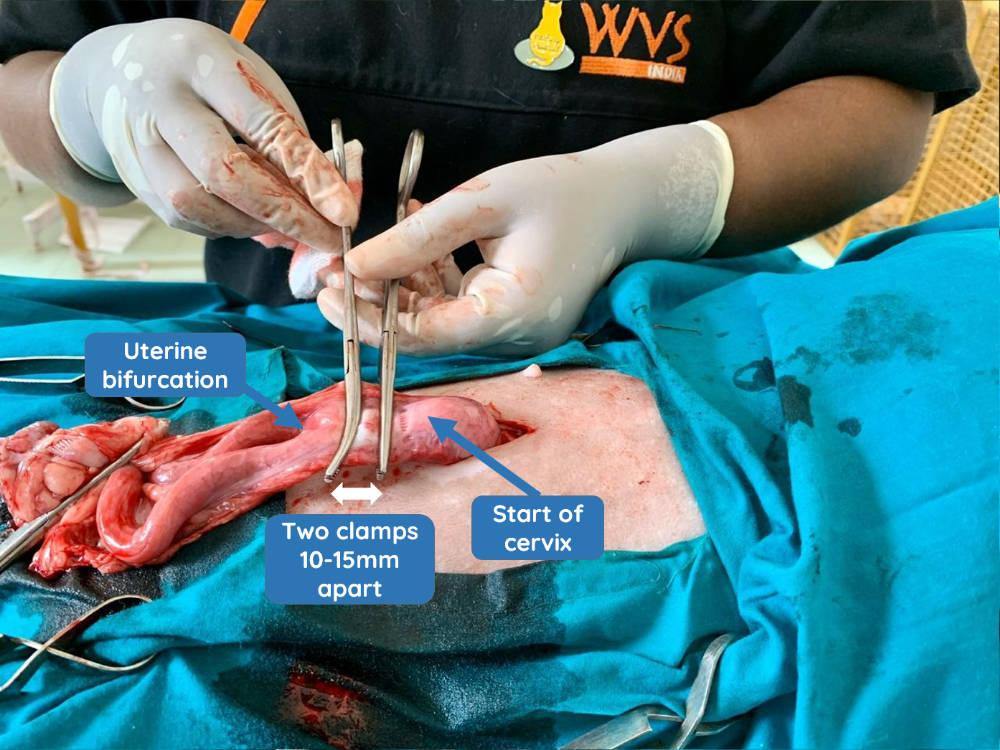
In young patients, ligation is performed in the same manner as the ovarian pedicle (Figures 13 to 16).
In cases of older dogs or those with pyometra/pregnancy, the uterine arteries should be ligated individually as they will be large and at greater risk of bleeding. They are ligated caudal to the most caudal clamp. This caudal clamp is then removed, and the uterus is ligated in the crush that remains with an encircling ligature. Alternatively, a transfixing ligature may be used to ligate both the uterine body and its vessels. This requires the suture to be placed through the wall of the uterine body, avoiding the lumen, and then passing the suture around the entire circumference of the uterus prior to ligation.
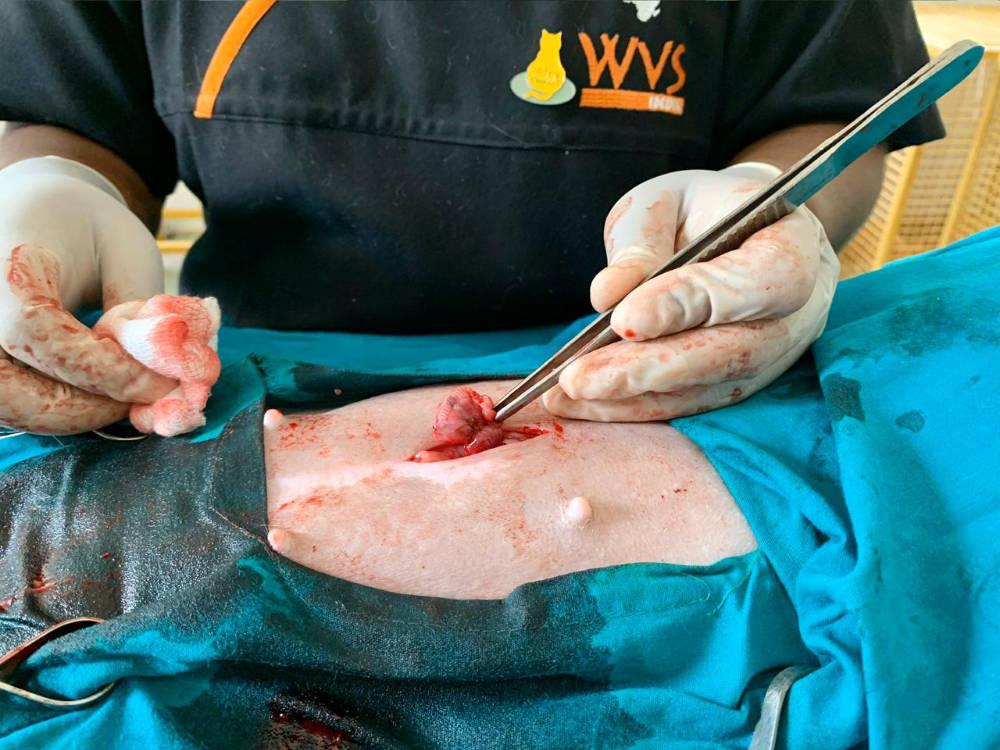
Transect the uterine body and observe for haemorrhages (Figures 17 and 18). The uterus and ovaries can now be safely removed from the patient.
Can I do an ovariectomy instead of an ovariohysterectomy (OH)?
Both procedures are suitable and effective in preventing pregnancy, and that the choice is down to the confidence and training of the individual veterinarian. There are advantages and disadvantages to both; for example, OH can be considered more risky due to the removal of the uterus and associated large vessels. OH prevents uterine cancer; however, the incidence of this is very low in dogs. Some vets prefer OH as it can reduce the risk of other issues associated with leaving the uterus intact.
Leaving part of the ovaries is unacceptable and must be avoided to prevent ongoing hormonal influences resulting in a stump pyometra.
Closing the abdominal cavity
Final inspection of the abdominal cavity. Before closing the abdominal cavity, displace the intestines to one side and visualise the ovarian and uterine ligatures. Check for bleeding; if there is any bleeding, re-ligate the affected area.
Closure of the abdominal cavity. Abdominal closure is achieved using a simple continuous suture pattern. At our ITCs, we routinely use 2-0 PGA for closure of abdomen, subcutaneous and intradermal layers.
The main aim is to ensure that the abdominal cavity is closed properly using strong and secure sutures which will prevent dehiscence.
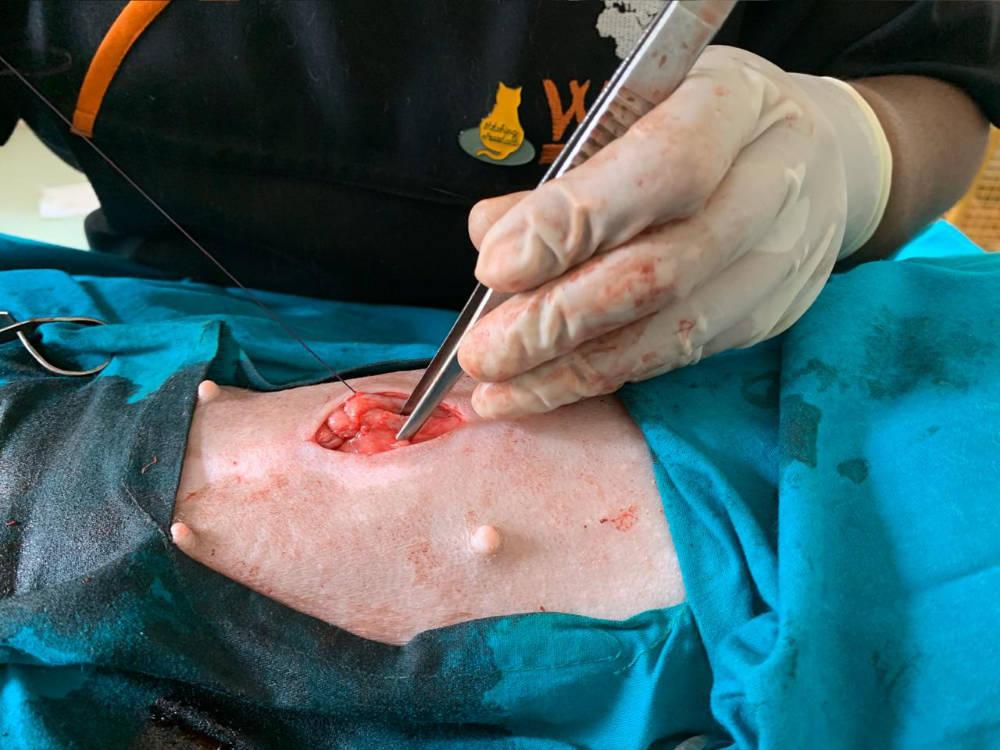
The strongest layer in the closure is the fascial component of the abdominal muscles; if this is not included, there is an increased risk of dehiscence. Suture bites must, therefore, include both the muscle and its fascia. The fascia may have retracted slightly making it less visible. Look for a thickened pale, shiny surface on the muscle; this is the fascia.
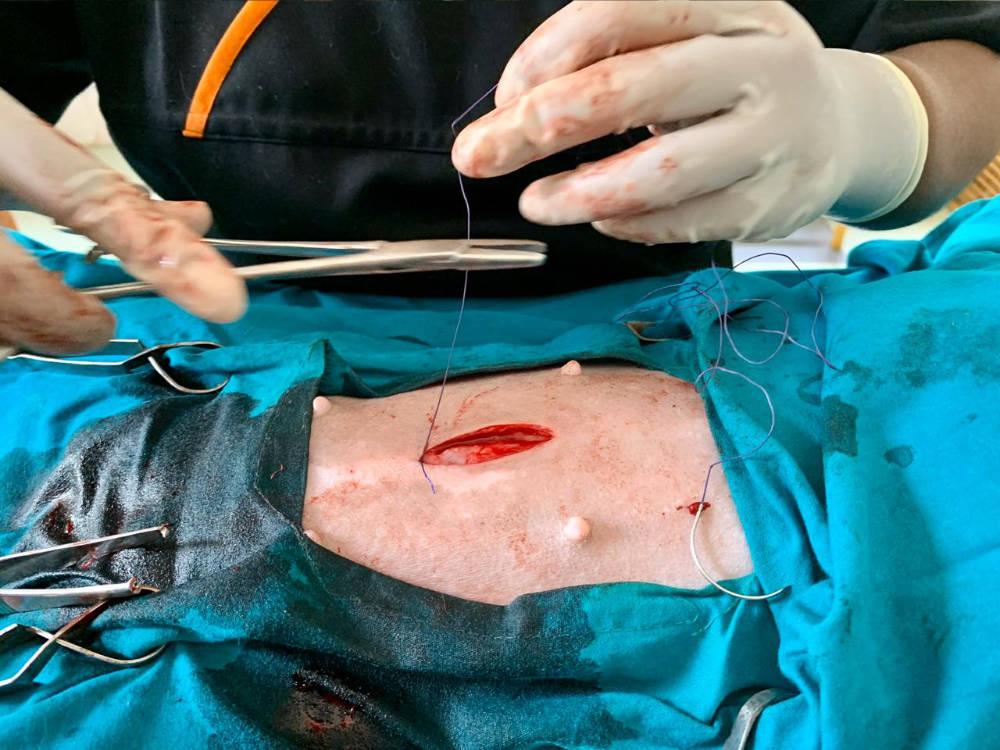
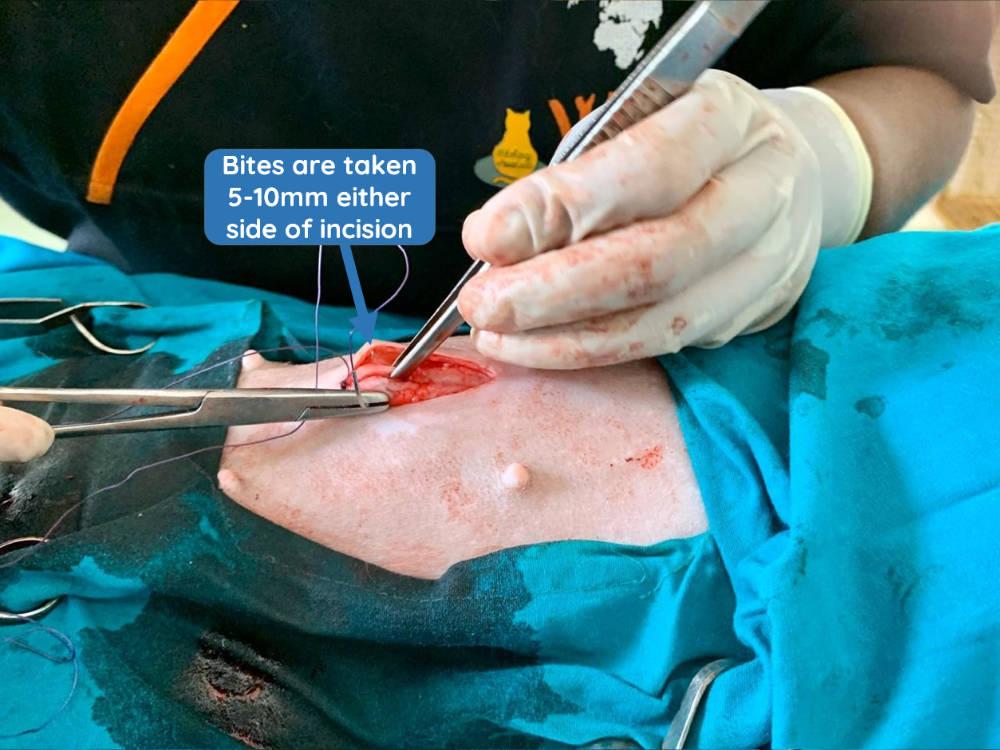
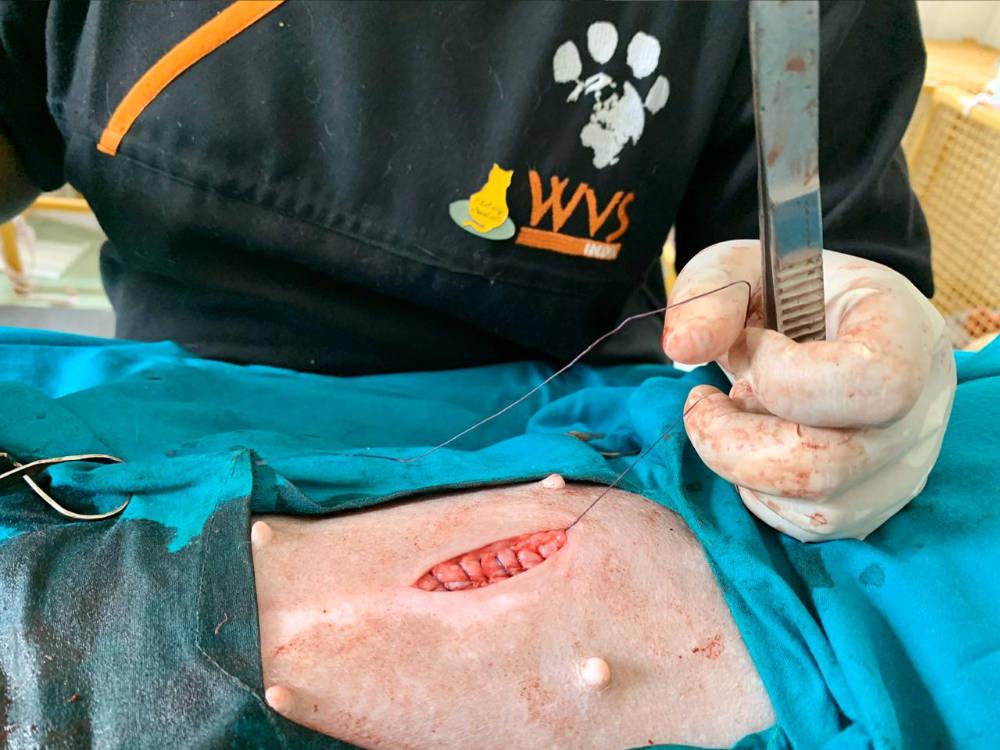
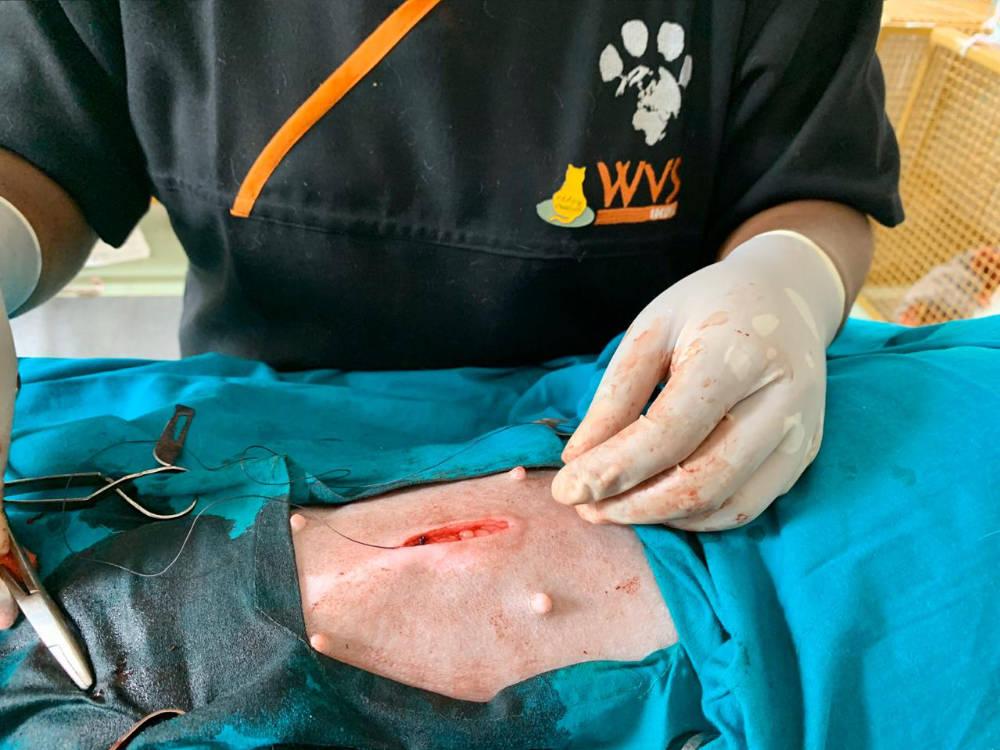
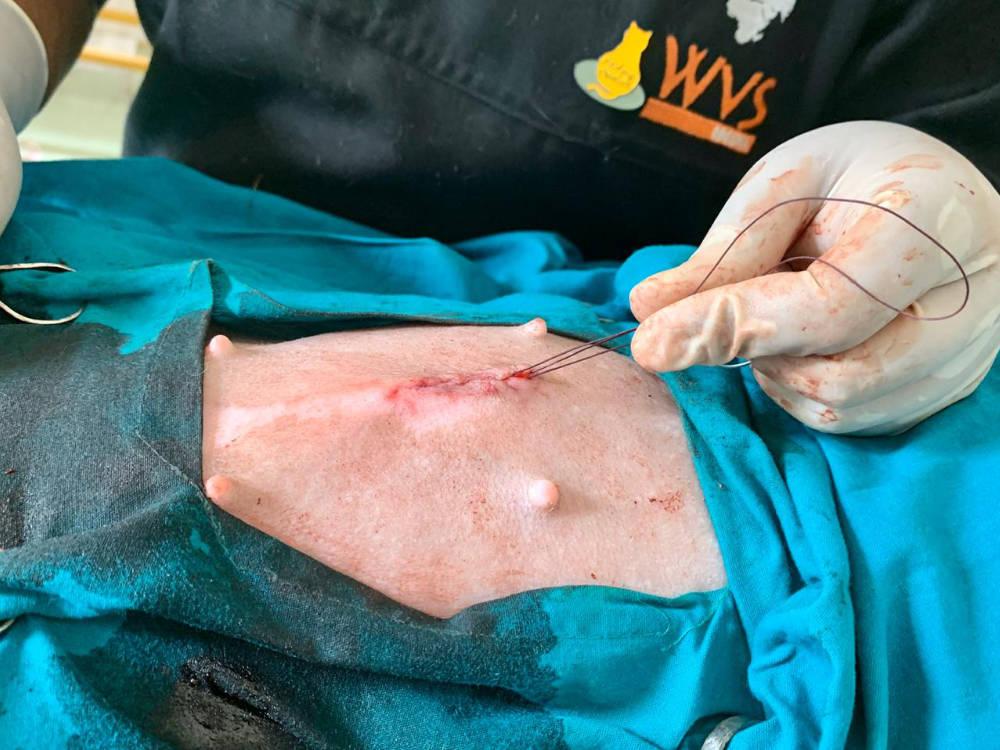
Suture bites should be placed in the fascia and muscle 5-10 mm from the incision, and 5-10 mm apart (depending on the animal's size). Place your first knot in the intact muscle directly adjacent to the incision (Figure 19). This ensures that the knot does not sit within the linea alba creating a gap.
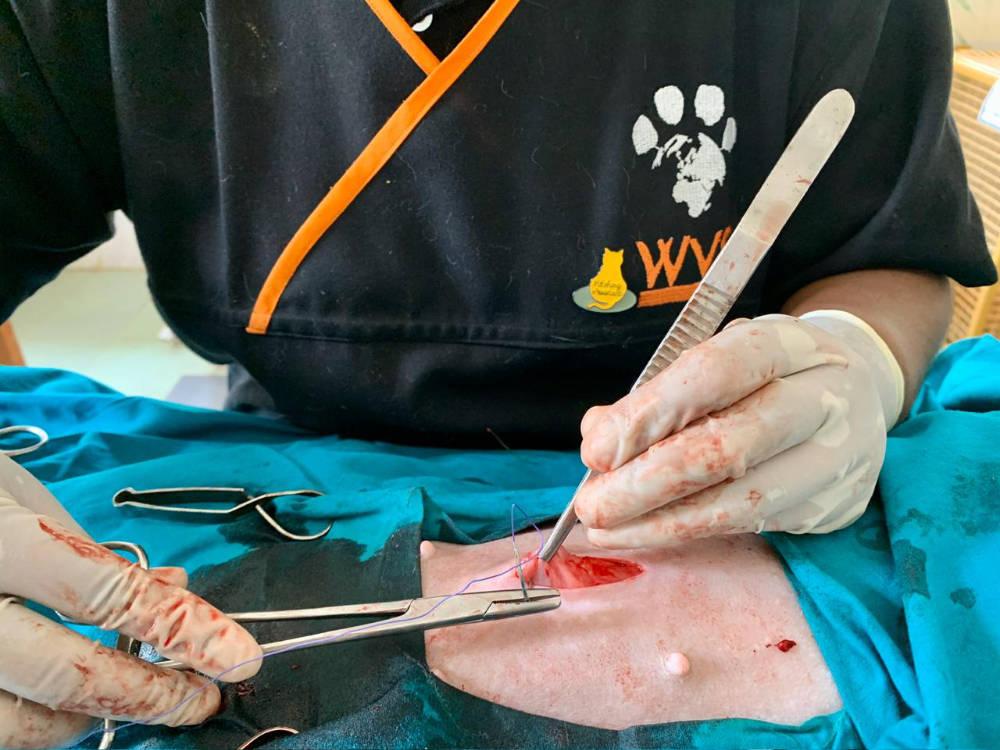
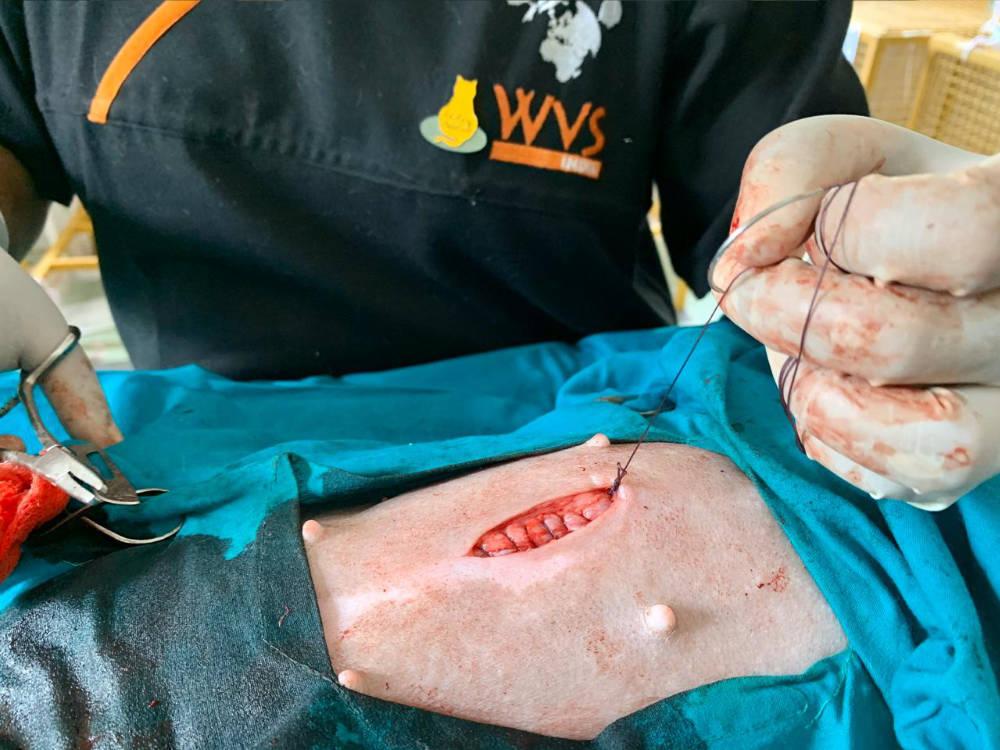
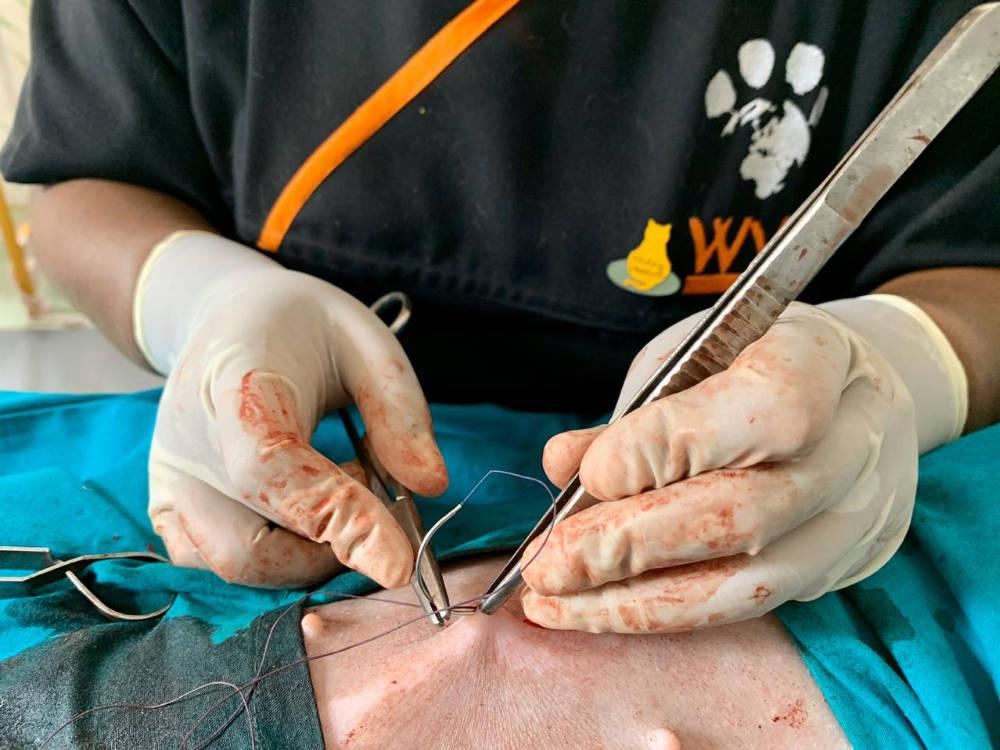
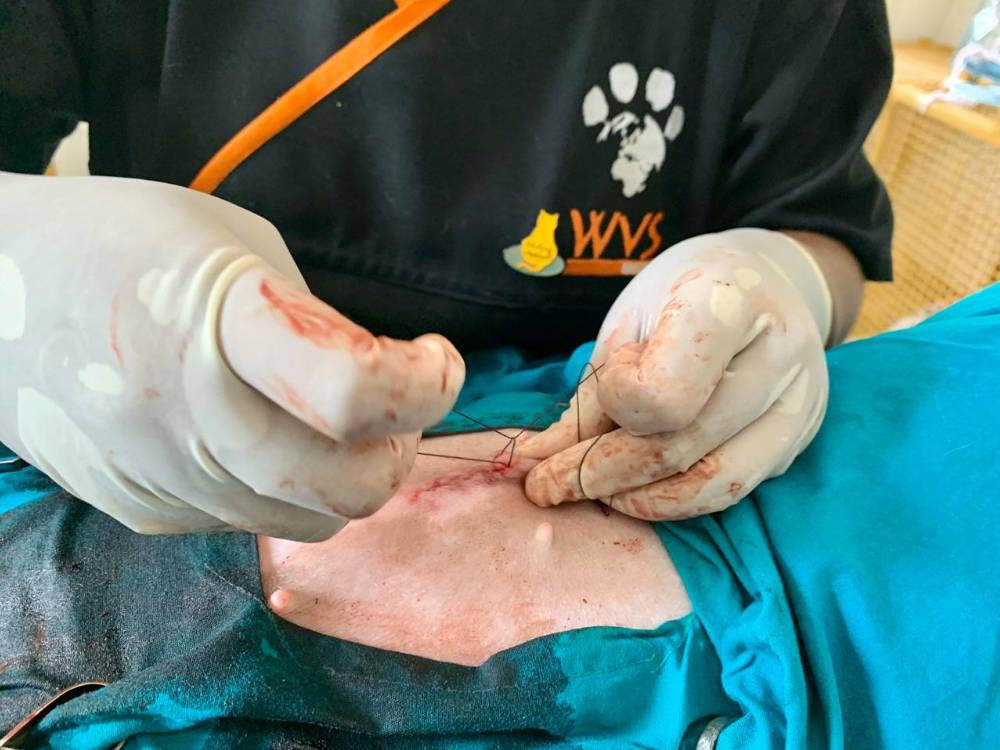
Tie a surgeon's knot and then 4-5 single-throw knots (Figures 20-22). These must be square, straight knots.
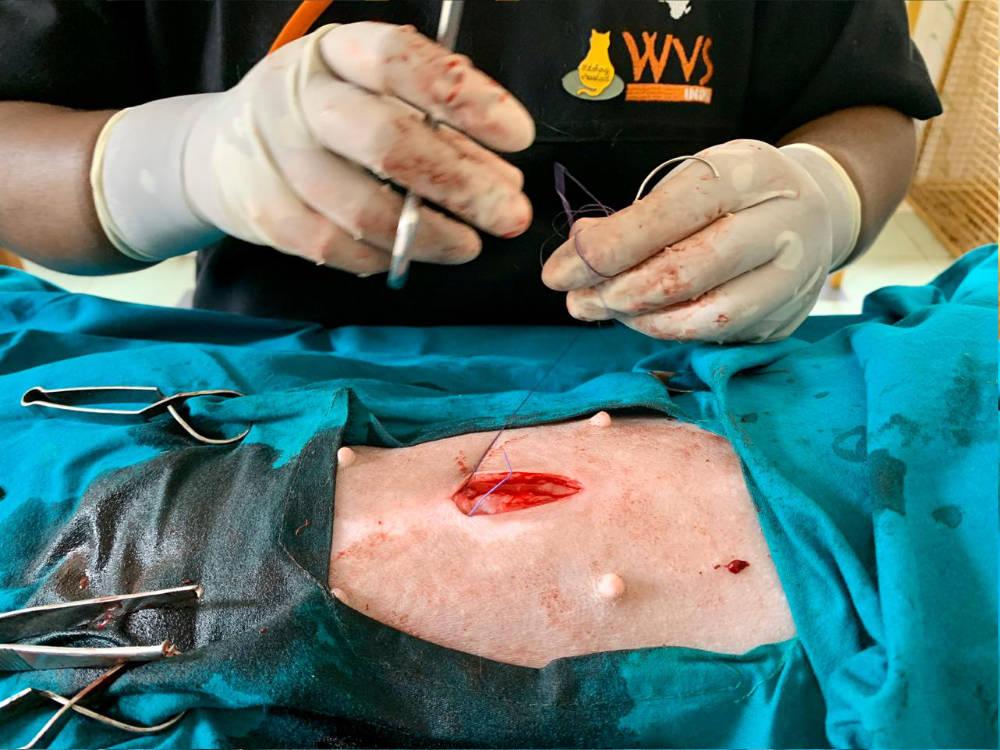
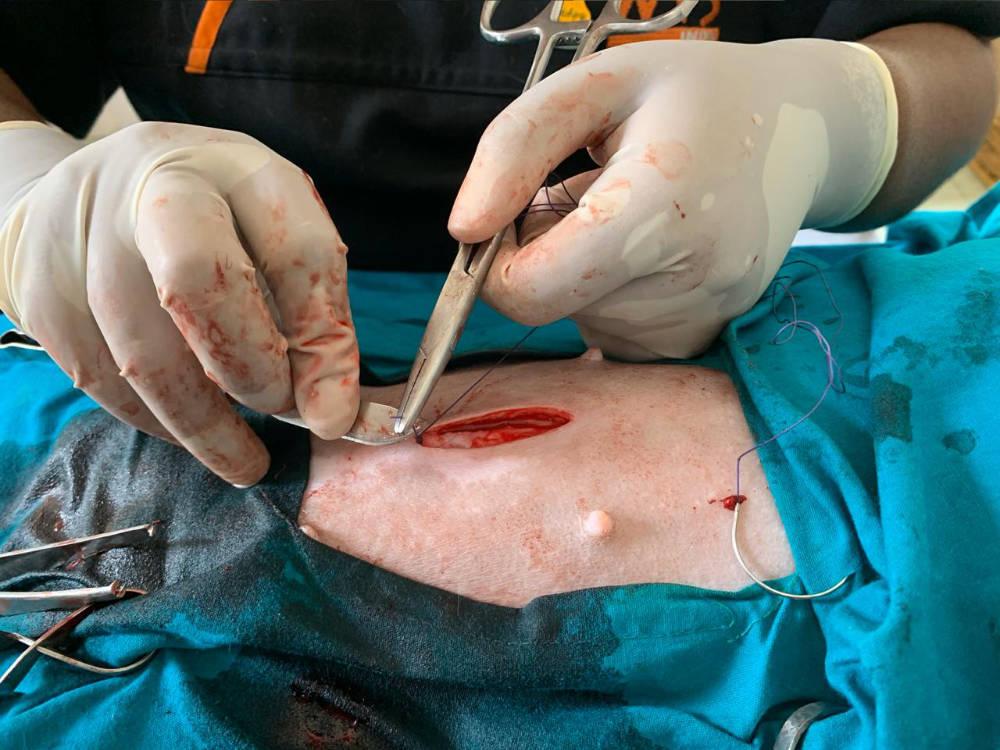
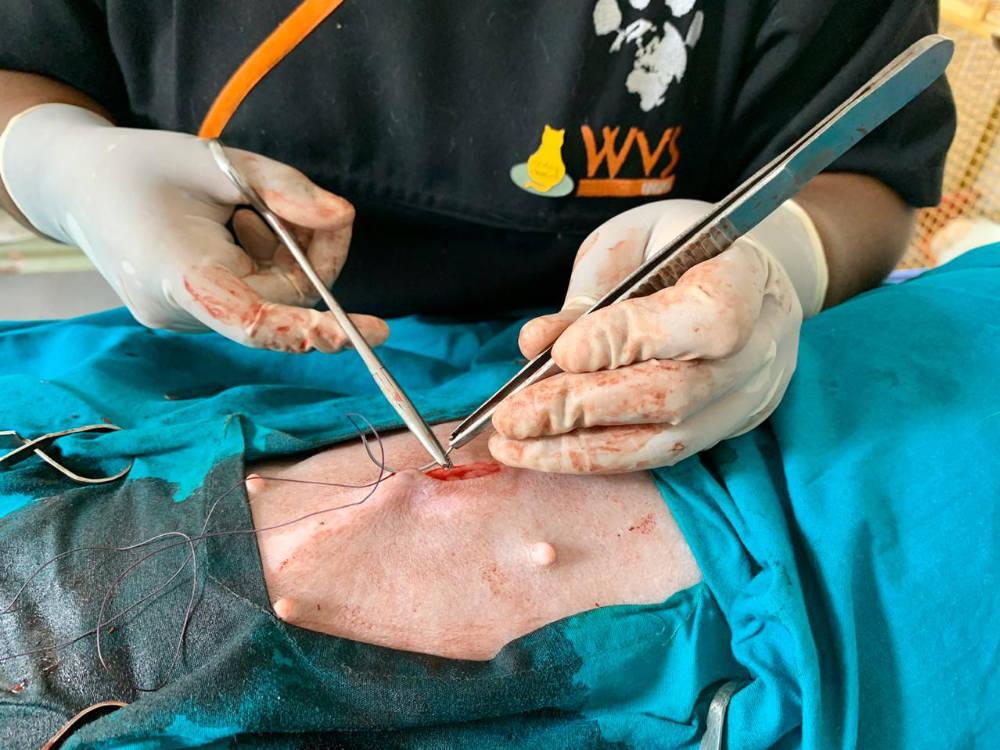
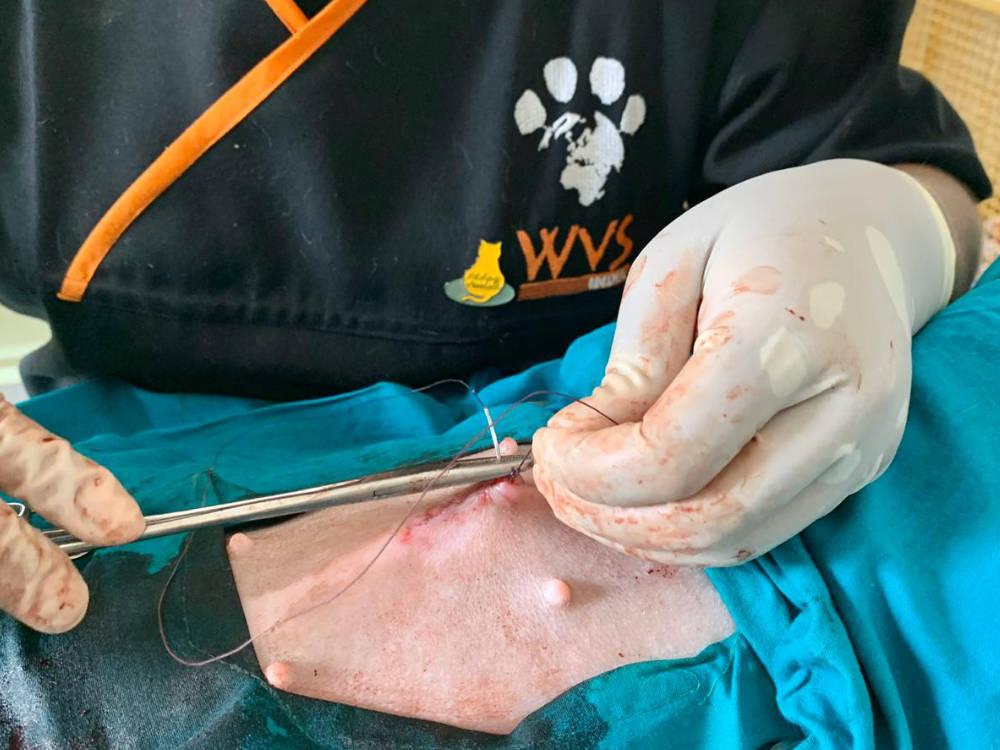
Continue this pattern with emphasis on adequate and consistent tension (Figures 23-25). Bites are placed at cross section through the linea alba with the needle pointing at right angles to the wound (avoid oblique bites as these result in longer bites with a wider gap). Keep the same distance between the bites and the same distance from the edge of the wound.
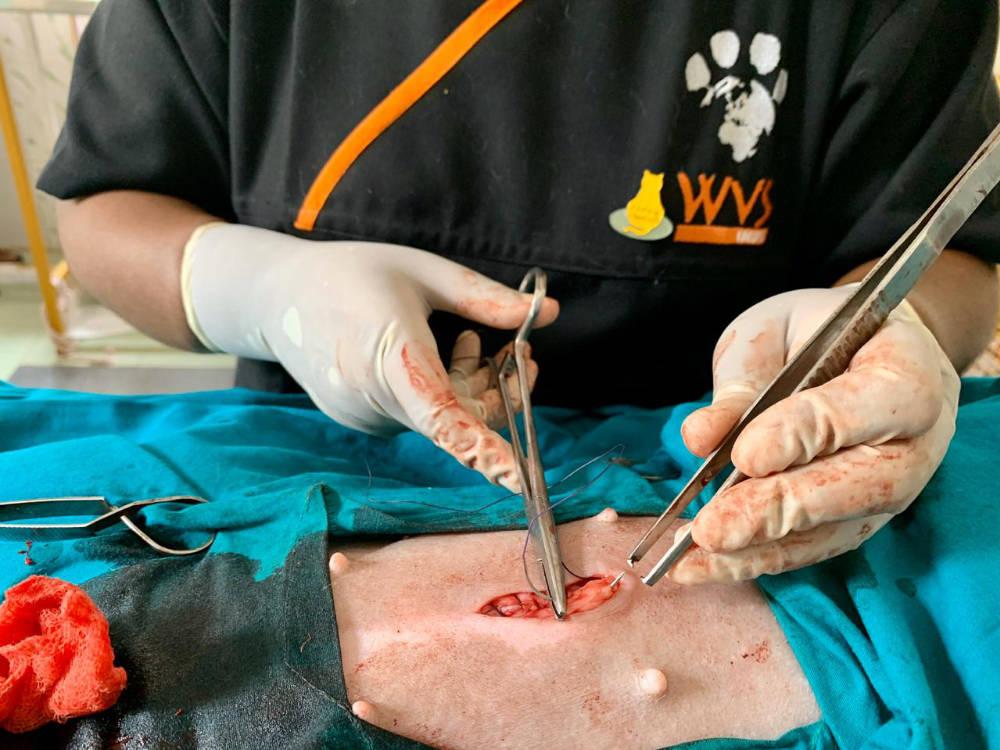
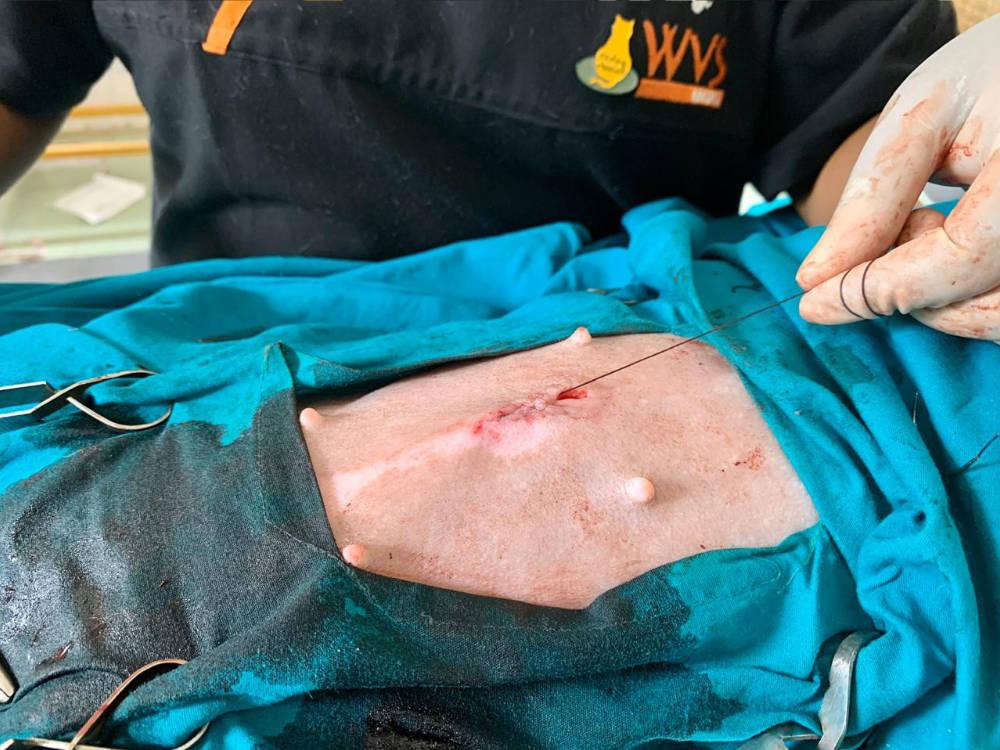
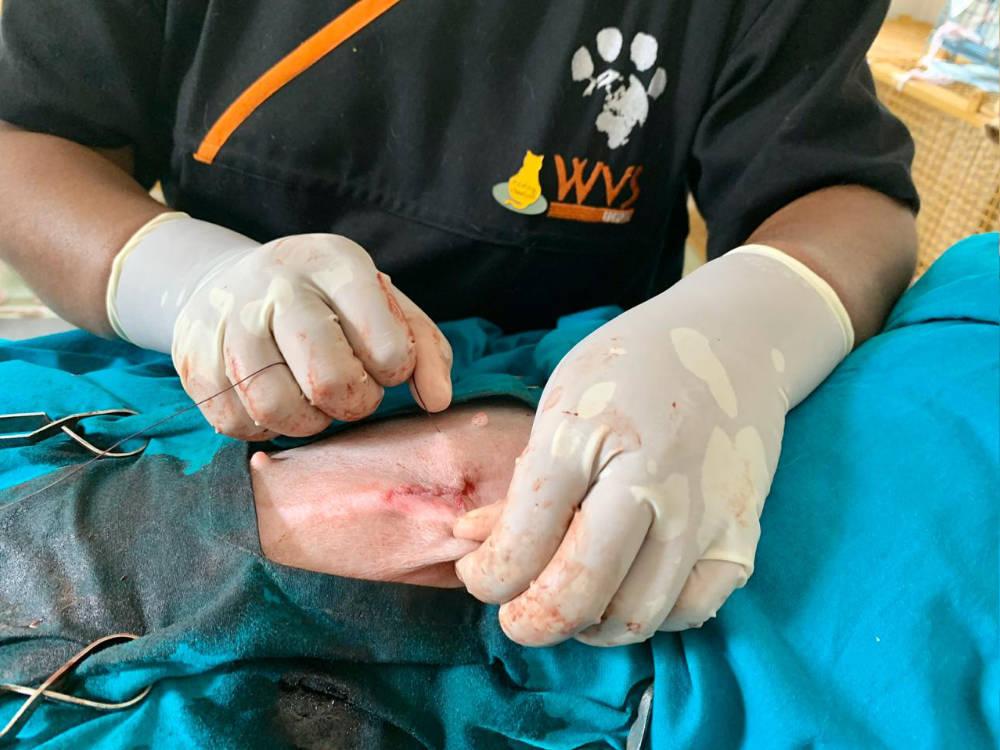
Tie a similar, secure knot to your initial one when you reach the end by leaving a small loop and using the end to create the knots (Figure 26).
In summary:
Simple continuous sutures are considered a secure and safe option for abdominal closure if both knots and all suture bites are placed correctly. Simple interrupted sutures can also be used for abdominal closure, however this is time consuming and uses a greater amount of suture material. The knot represents the weakest point in a suture pattern and so provided both knots in the simple continuous pattern are secure, this is the optimal closure pattern.
Closing the subcutaneous layer
The main aim is to reduce dead space and to bring the skin edges together in order to minimise tension during the final, intradermal layer. Skin tension can result in wound dehiscence.
To achieve this goal, bites should be adequately spaced; not too close and not too far from each other (Figures 27-30). As you proceed, check that the dead space is reducing; observe the tissue to ensure that there is not a tunnel between the muscle layer and the sutured subcutaneous tissue.
A simple continuous suture pattern is good choice for this layer.

Closing the skin layer
The main aim is to oppose the skin edges correctly. This will maximise healing of this layer, thereby re-establishing the protective barrier function of the skin and minimising infection risk.
Traditionally, the skin layer can be closed with simple interrupted skin sutures or by placing a continuous intradermal pattern; in spay-neuter settings, an intradermal pattern is commonly used because:
- it apposes the skin edges well and avoid gaps which may cause infection due to either contamination, or secondary to licking from irritation.
- there are no sutures to remove once the skin has healed, enabling dogs to be released in a timely way back to their environments.
There, placing the intradermal sutures correctly is a key stage!
Start of suture pattern. Start from the very beginning of the skin incision and take a short bite into the dermal layer, ensuring you do not include the external skin surface (Figures 31-32).
After this, take horizontal bites, entering the dermis along the cut edge of the skin. Ensure that you are parallel to the incision line for 4-8 mm and then exit the dermis on the same side. As you proceed to take a bite from the opposite site, observe carefully where you previously exited and enter just a little ahead of that in order to avoid gaps.
The length of your bite should be longer than the distance between where you exited and where you go in again. If your bite is short e.g. a tiny fragment only, the suture material will easily cut through the tissue and enable the wound to open. Therefore, the way to ensure that you have enough tissue in your bites is to make the bites sufficiently long and parallel to the wound.
The intradermal sutures must not emerge through the skin; this will immediatley compromise healing by providing a point for introduction of infection.
Securing your sutures. As you near the end, begin to plan the final knot well in advance. Ensure that you take adequate tissue in your last bite to provide strength to the knot. A useful technique is to leave the second last and the last bite a little loose (Figure 33).
Then tighten the second last bite and proceed to make the Aberdeen knot. Leave a loop of suture before closing the skin in order to secure the suturing with an Aberdeen knot (Figures 34-35).
If there is no space to take a 4mm long bite parallel to the wound as the last bite, you can also take the last bite perpendicular to the wound, staring from further away and exiting close to the incision.
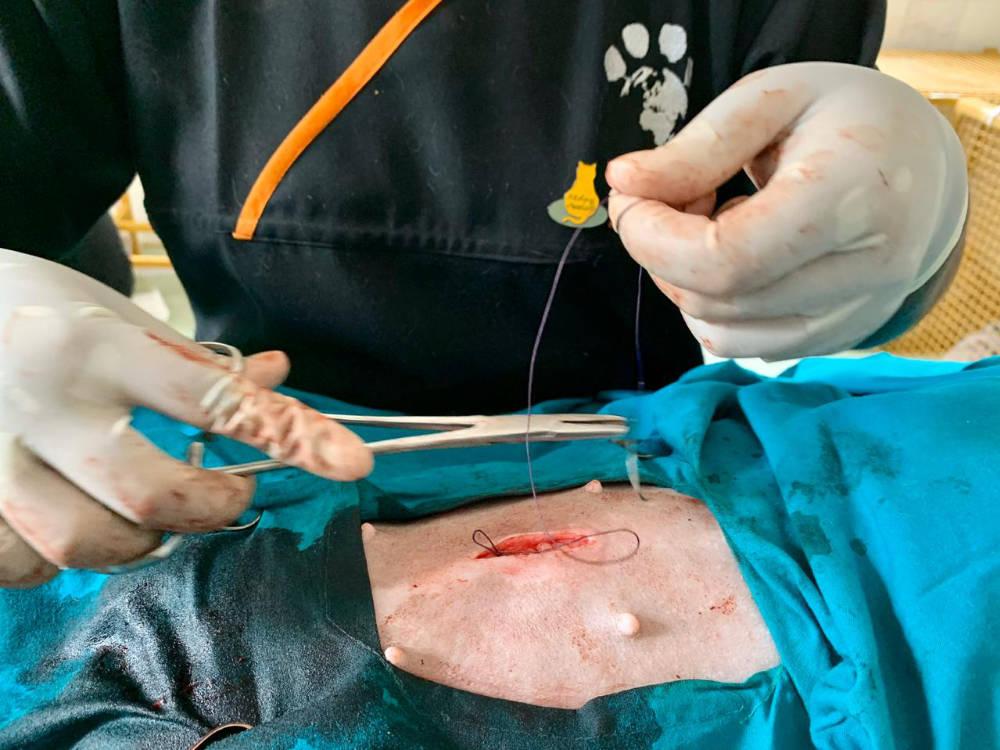
Bury the knot by holding the needle perpendicular to the incision site. Direct the needle through a suitable gap in the incision adjacent to the knot, and then exit through the intact skin approximately 1cm from the suture line (Figure 36).
Pull the suture material carefully until you hear or feel a 'pop' of the knot being buried.
Now cut the suture material close to the skin to ensure it remains subcutaneous and not extending through the skin (Figure 38).
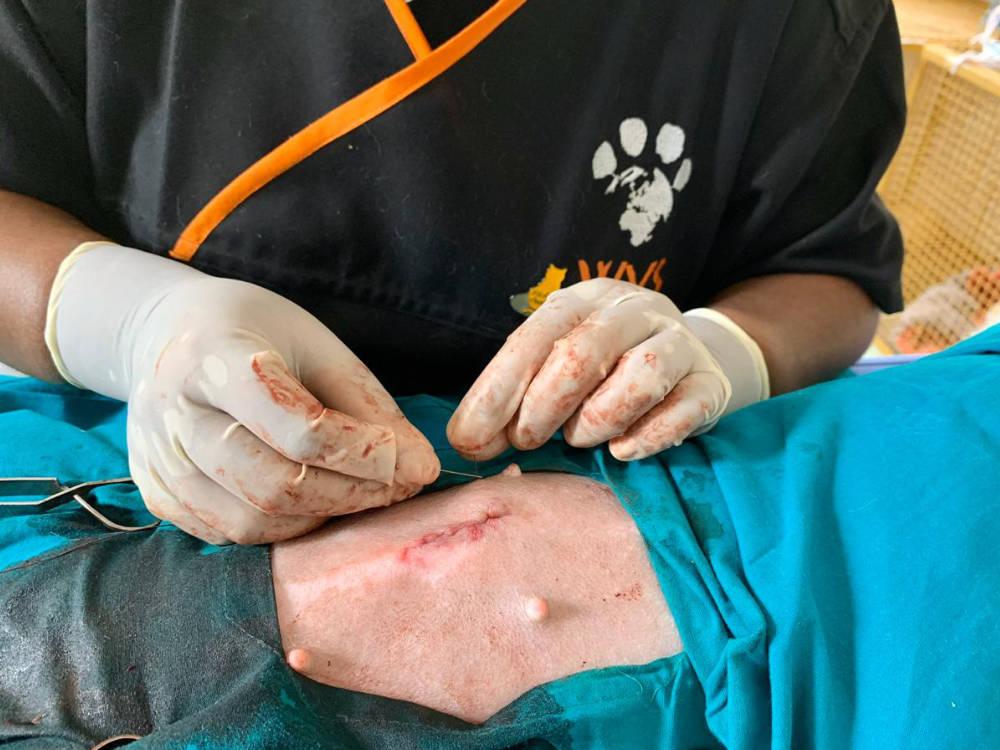
Your surgery is now complete. Check that there are no gaps in the intradermal suture which could introduce infection (Figure 39).