

Knots are the weakest point of the suturing process and therefore it is vitally important to tie, secure and safe knots, in order to prevent dehiscence. A surgeon must practice these techniques and become competent prior to performing surgery.
A number of points must be considered to ensure that a secure knot is tied:
- Correct suture material type
- Correct size
- Correct number of throws on the knot
- Correct tension
Methods for tying knots
There are two ways to tie a knot: either by using an instrument, such as needle holders, or by hand.
Instrument ties
Instrument ties are more commonly used by surgeons. There is less wastage of suture material compared to hand tying. If you are using this method, remember to only ever grasp the material itself at its end; this is because the surgical needle-holders that you are using to grab the suture material can crush it mildly, creating a point of weakness that will increase the chance of it snapping under slight tension.
Hand ties
Hand ties are often used for tying ligatures, especially around vessels. This method enables the surgeon to place equal tension on both sides of the suture, ensuing a secure knot. More suture material is wasted using this method, but the greater tactile feedback helps ensure a tighter ligation, with better uniform tension and greater knot security. In addition, it is easier to use this method in a deep body cavity where there is limited room for instruments, such as the ovarian pedicle. There are two types of hand ties: one handed, and two handed ties.
- One handed ties are easier to place, but do not allow as good control over suture tension
- Two handed ties allow for greater control over suture tension
Hand ties are tricky to learn and require repeated practice. It is best to learn both methods, and then, once familiar, choose the one to use which you find the easiest to remember.
Types of knots
Square knot
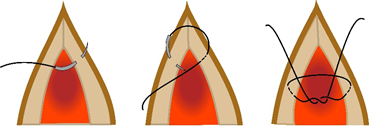
This is the most basic knot type and it consists of two single throws laid on top of each other (Figure 1). The second throw is then the reverse of the first throw. Even tension must be maintained as each throw is tied — otherwise, a slip knot will form instead. Further throws can then be added on top.
A series of superimposed square knots is the most reliable type of knot.
Square knots are commonly used for sutures and ligatures (e.g. for vessels or ovarian pedicle)
Surgeon's knot
This is similar, except that there is a double throw instead of a single throw initially (Figure 2).
Caution! The extra initial throw in a surgeon’s knot adds friction to the ligation right from the start, and can be seen to bind prematurely. This can fool the surgeon into thinking that it has been tied tightly, when in reality, it hasn't.
These knots have greater security due to the frictional effects of two initial throws, but they can be more difficult to tighten and are more bulky. They are often used in areas of tension, as it helps reduce the chance of the knot loosening during looping of the second throw. Note that it is not recommended to tie a surgeon's knot using monofilament or coated multifilament, which have lower knot security than other materials.
A surgeon's knot should be reserved for areas of tension, such as closing the abdominal muscle layer during a spay. It is also adequate for small vessels when using thinner suture material. It is inadequate for large, bulky pedicles
Miller's (strangle) knot
Miller's knot can be very useful for tying vessels and ligatures, especially large ligatures such as an ovarian pedicle or uterine body. It is secure and easy to perform.
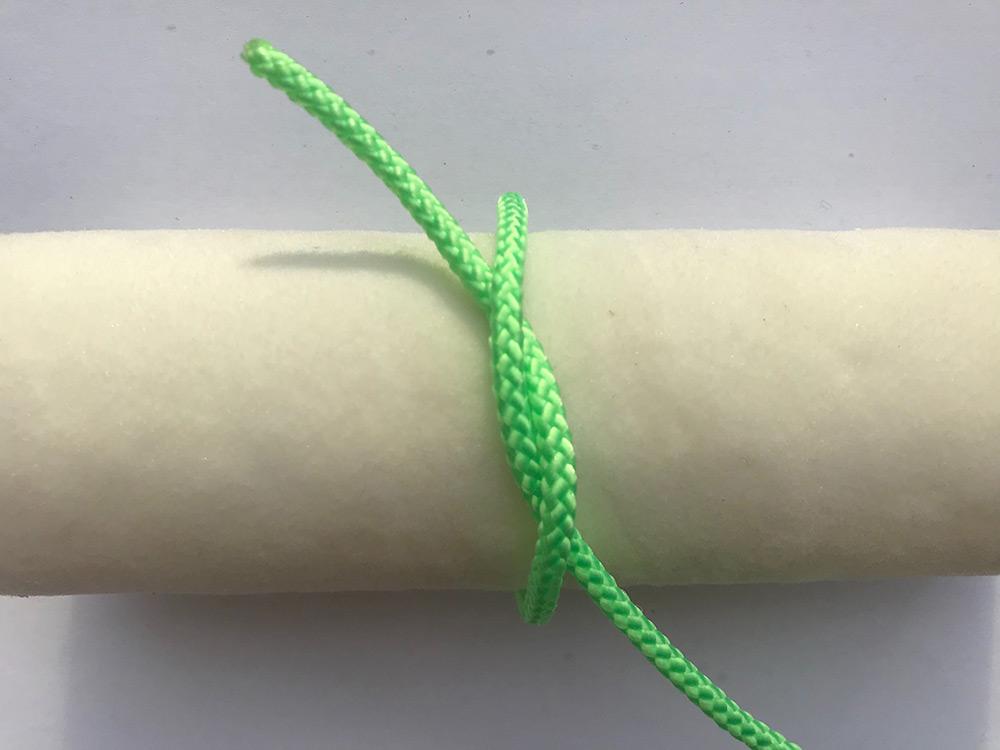
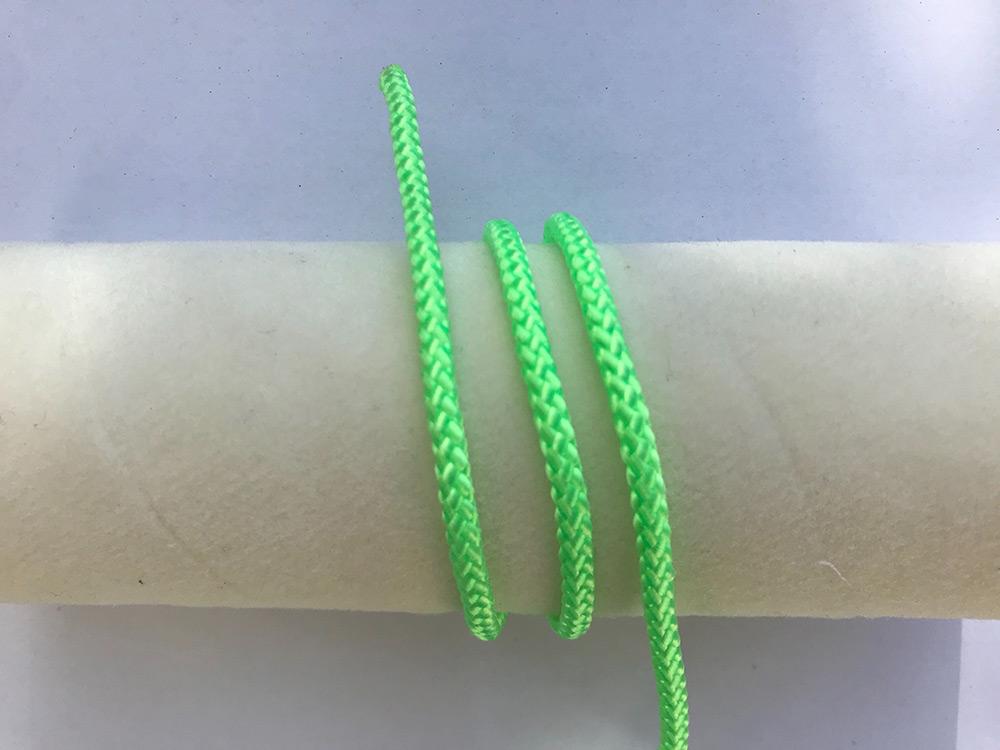
The images below take you through how to tie this knot. Remember that you will likely be using needle holders to direct the suture material, while using the fingers of your other hand to keep it in the correct location
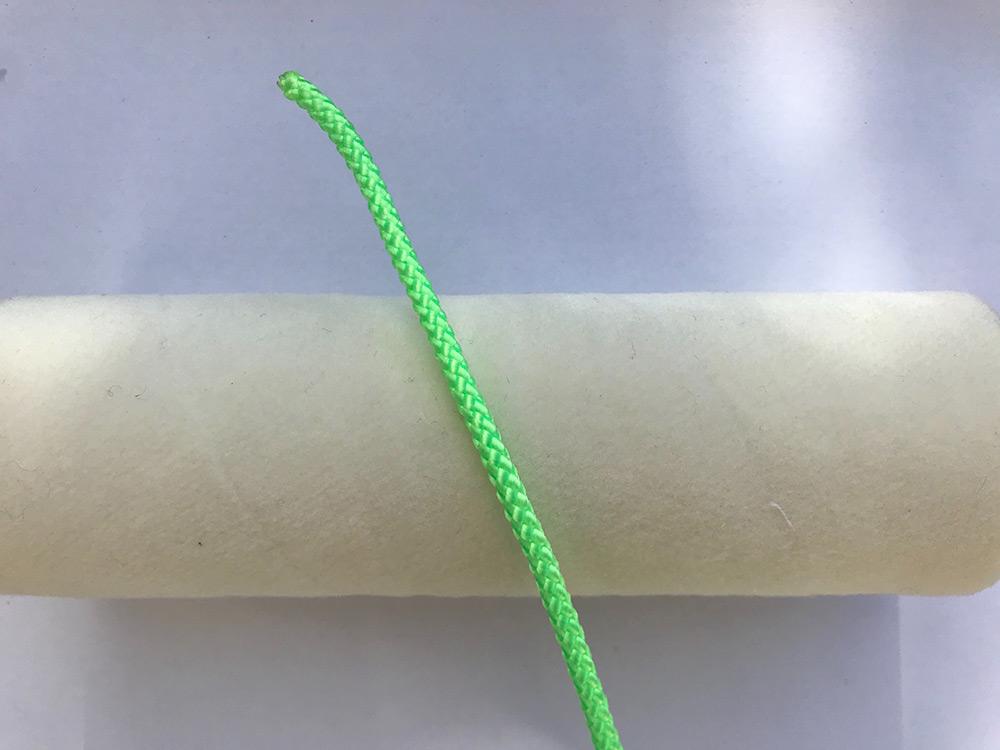
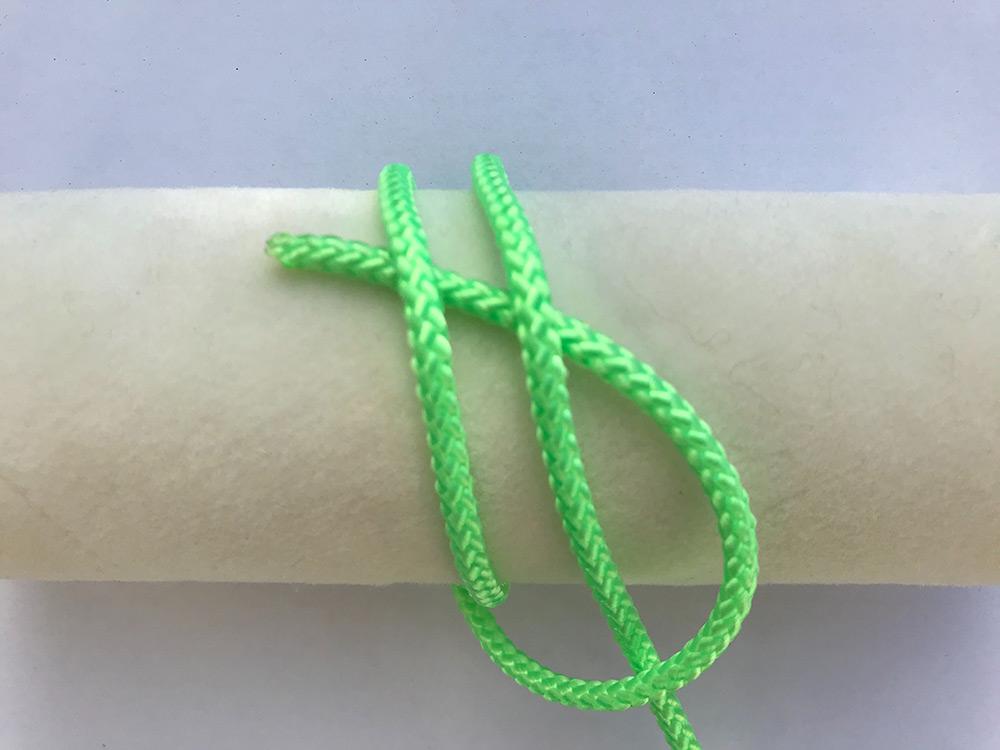
Guide the suture material under and around the pedicle to form a complete circle (Figures 3 and 4).
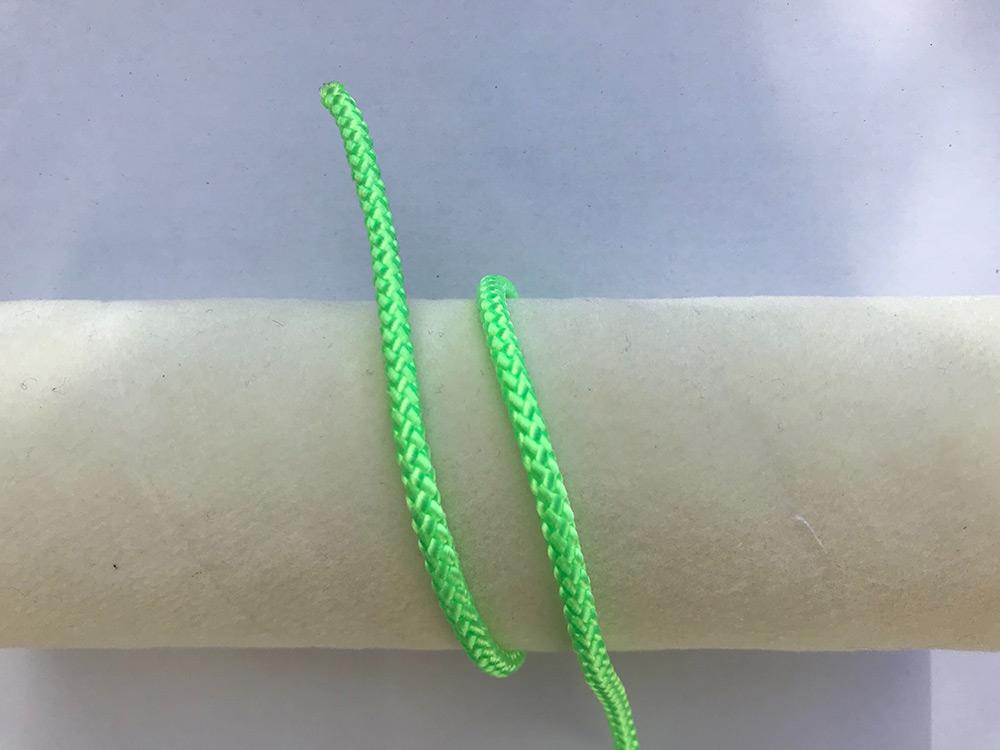
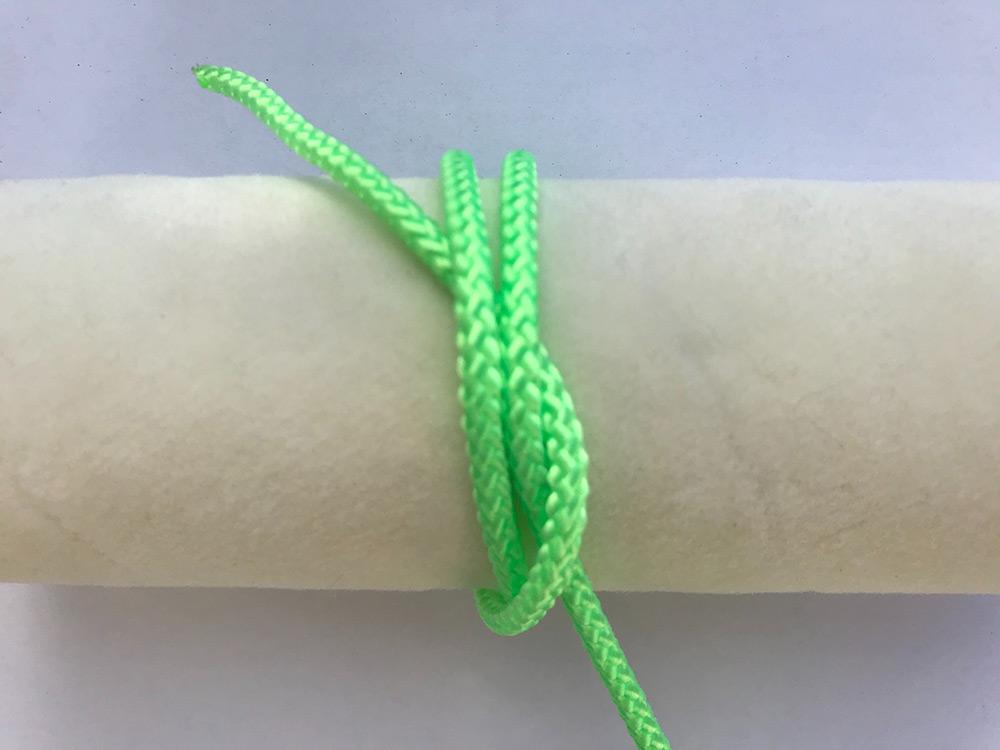
Repeat this process so that you have two loops around the pedicle (Figure 5).
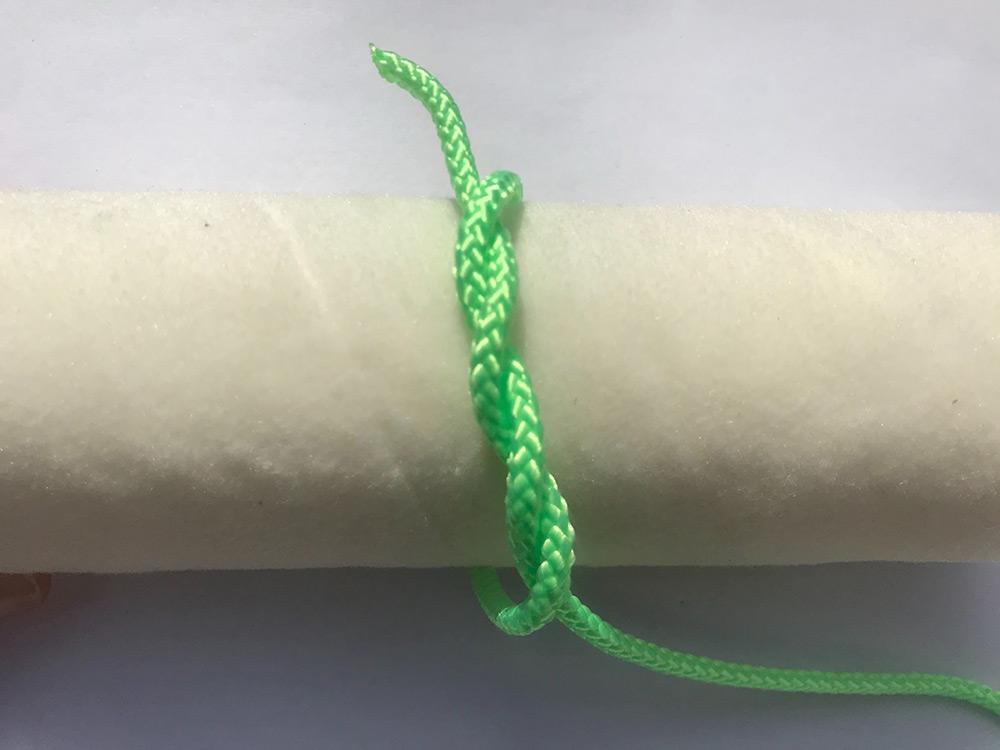
Take the end and pass it over the two loops, and then back under them (Figure 6).
Tighten the knot by applying even tension at both ends, without using excessive force (Figure 7).
Unlike the surgeon's knot, a Miller's knot does not bind prematurely, and therefore provides more reassurance that the knot has been tightened sufficiently. It works by increasing the amount of suture material surface in contact with the tissue, thereby increasing frictional forces with greater surface area for compression.
It is not recommended to use a Miller's knot when using catgut; however, it is an excellent choice when using a synthetic absorbable material, such as polyglactin 910.
Ligation of vessels and pedicles, such as ovarian pedicle and uterus.
How many throws should I use?
The number of throws used is a balance between ensuring good knot security and avoiding excessive suture material, which can incite an inflammatory response and become a nidus for bacterial contamination. The number of throws you choose will depend on the suture material and the pattern.
Multifilament material has the greatest knot security, and, when used as an interrupted pattern, a further 3 throws on top of a square or surgeon’s knot is adequate.
Monofilament material requires slightly more throws and particular attention to the knot. You should make sure there are no visible 'gaps' between each throw on a monofilament knot; if you can see this, then the knot has not been tied securely between each throw.
Tips for tying a secure knot
- When tying a knot, hold the needle holder in the middle of the wound and pass the suture around the instrument.
- Grasp the opposite end of the suture material; this will make it easier to tie the knot and will also mean you do not grasp and weaken suture that is to be left in the body.
- Pull each end of the throw with even speed, horizontally (parallel) to the tissue.
- Lay the first throw onto the tissue with the amount of tension desired for that situation.
- When placing the 2nd throw (and subsequent ones), continue to pull at the same speed and horizontally on each suture end. This will prevent the first throw being disrupted, and will prevent the knot becoming a sliding one.
Techniques for burying a knot
For continuous suture patterns involving the skin such as an intradermal pattern, it is important to ensure that the knot is fully buried, so that it does not introduce bacteria into the wound. This is achieved by placing the knot under the skin. Two commonly used methods are described below:
Buried square knot
Once the end of the wound has been reached with only a small gap remaining, proceed as follows: on one side, insert the needle from the deepest part and exit more superficially than on the other side. Next, reverse this by entering superficially and exiting deep. Tie the ends in a square knot. Cut the end not attached to the needle. Direct the needle through a suitable gap in the incision adjacent to the knot, and then exit through the intact skin, approximately 1 cm from the suture line.
Aberdeen knot
An Aberdeen knot is a strong and secure method of ending a continuous suture line. It is most commonly used at the end of a subcutaneous and intradermal tissue closure. When used in subcutaneous tissue, it enables the surgeon to continue directly to closing the intradermal layer, without cutting the suture and starting a new line. It also allows for the surgeon to 'bury' the knot after an intradermal layer — so that no suture material is left externally after the procedure to remain a nidus for bacteria and infection.
The Aberdeen knot has been shown to be as strong as, and less bulky than, a traditional 4-square knot, thereby reducing the amount of foreign material in the body[1]. Aberdeen knots are suitable for both spay and castration surgeries as they can reduce the suturing time, as well as being convenient and safe.
Suture ends
If the suture ends are cut too short, then even the best placed knots will unravel. The 'ears' of the suture should be left around 2-3mm long. When placing external skin sutures, leaving the ends around 5mm long helps with suture removal later on.
If you are using catgut, 6mm ends should be left to ensure that the knot does not unravel.