

IV catheter placement is an every-day procedure for most clinical vets and nurses and is essential for the administration of medications during an emergency and routine surgical procedures as well as many routine treatments. Although placing IV catheters will become second-nature over time, it is a skill which requires concerted effort to refine. In this article we give an overview of types of catheters, key principles for catheter maintenance and a step-by-step guide to placement. It is good practice to place an IV catheter for every anaesthetic to maintain IV access in case of emergency.
Types of catheter
Catheter types include 'over-the-needle' and 'over-the-wire' variations, however 'winged' or 'butterfly needles' can also provide continued IV access for short procedures.
Silicone and polyruethane are minimally reactive, whereas polyprolylene and PVC are the most reactive and thrombogenic.
Over-the-needle
- are easy to stabilise
- the catheter remaining in the vein is blunt therefore less likely to cause phlebitis
- fluids can be administered at high rates
- suitable for remaining indwelling for up to 5 days, if checked regularly and no signs of inflammation, after which they should be removed and a catheter placed at a new location if needed
- various gauges and lengths are available
Winged needles (butterfly)
- are designed for short-term use, for example, during a short anaesthesia, giving medication etc
- are simple to place but can be difficult to maintain
- are the least stable option and can easily puncture the vessel wall, leading to loss of venous access, extravasation of infiltrated fluid and making it difficult to regain access in the same leg
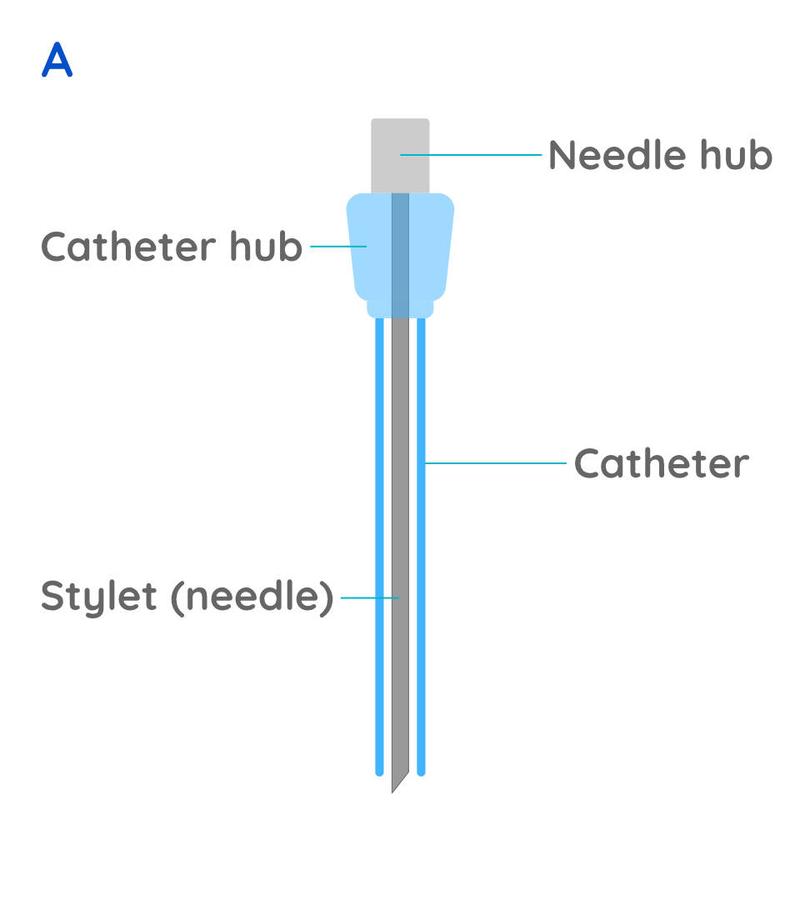
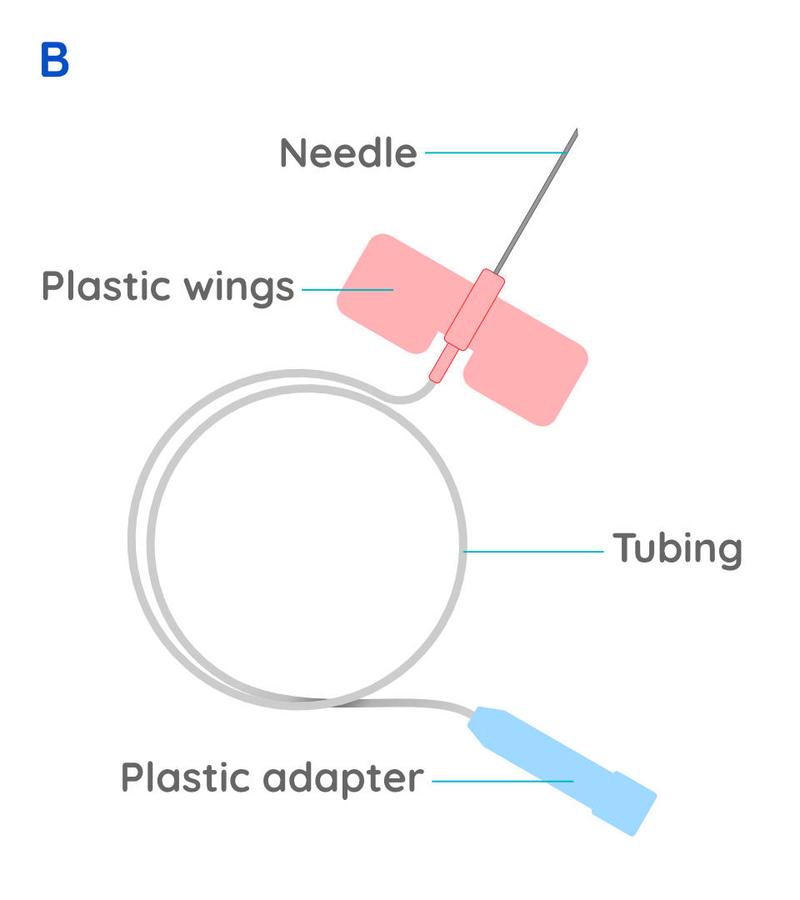
Figure 1 - Illustrations of over-the-needle catheter (A) and butterfly-needle (B). With the catheter the needle is used to enter the blood vessel, but is then removed leaving nothing sharp in the vein, whereas with butterfly needles the needle sits within the vein and the plastic wings are used to stabilise it on the skin, but there is a high risk of the needle moving and coming out of the vein with any movement.
Over-the-wire
These are longer catheters for use in the jugular vein for central venous access over a longer period of time (also called central lines). They must be placed under surgical conditions in anesthetised patients due to the increased risks associated with perforating the jugular vein and the need for complete asepsis.
Catheter care and maintenance When administering IV medications via a catheter, it is important to first check that the catheter is within the vein and there is no leakage of fluid around the point of entry into the vein. To do this, the catheter must be flushed each time before administering IV medications. Do this by palpating the vein proximal to the catheter and observe the area around the catheter as you administer 1 - 2ml of heparinised saline. If the catheter is correctly in place you will feel the vein raise as the fluid passes your finger and you should not see any subcutaneous swelling. If you do not feel the fluid pass in the vein, reposition the animal and repeat the above steps. If there is any swelling as you flush the catheter, or you are not confident that it is still in the vein, then do not administer medications. The catheter should be removed and either replaced with a new catheter at a more proximal location in the same vein or in a different leg. Even if medications are not being given, it is important to flush IV lines with 2ml of heparinised saline at least every 4 hours to keep the catheter patent. For small patients, be sure to consider the volume of fluid in amounts used to flush catheters as part of intravenous fluid therapy calculations. Indwelling IV catheters must be routinely examined for signs phlebitis and cellulitis at least once a day. This involves removing bandaging and tape from around the catheter site to inspect the skin for signs of inflammation (redness, swelling or pain). If inflammation is observed, do not administer medications into the catheter. The catheter should be removed and a new one placed in a different vein if still required.
Preparing for placement
Have the following equipment ready for use before you start:
- Clippers or blades
- Gauzes soaked in antiseptic e.g. chlorhexidine for cleaning the skin and separate swabs soaked in spirit
- Gloves
- Intravenous catheter. The size depends on the patient; use the largest catheter that is comfortable for the patient.
- Surgical tape
- T connector or injection cap (or a suitable alternative)
- Dressing material
- 5ml syringe filed with heparinised saline
- Tourniquet or assistant to raise the vein
Catheter sizes The gauge of the catheter will affect the rate that fluid can be passed, so the larger the animal, the larger the catheter gauge needed. In emergencies, being able to place the largest catheter possible will enable higher rates of fluid therapy, however speed is also critical and so repeated attempts should be minimised. Dogs: A 20g fits most dogs; if the dog is particularly large, then an 18g is appropriate. Cats: 22g is suitable for most cats. The length of the catheter varies so choose an appropriate length for your patient size.
How to place an intravenous catheter
The cephalic vein (in the forelimb) and lateral saphenous vein (hindlimb) are readily accessible for IV catheter placement, although the hindlimb location can be prone to contamination from urine and faeces. Other options are the accessory cephalic, and medial saphenous veins.
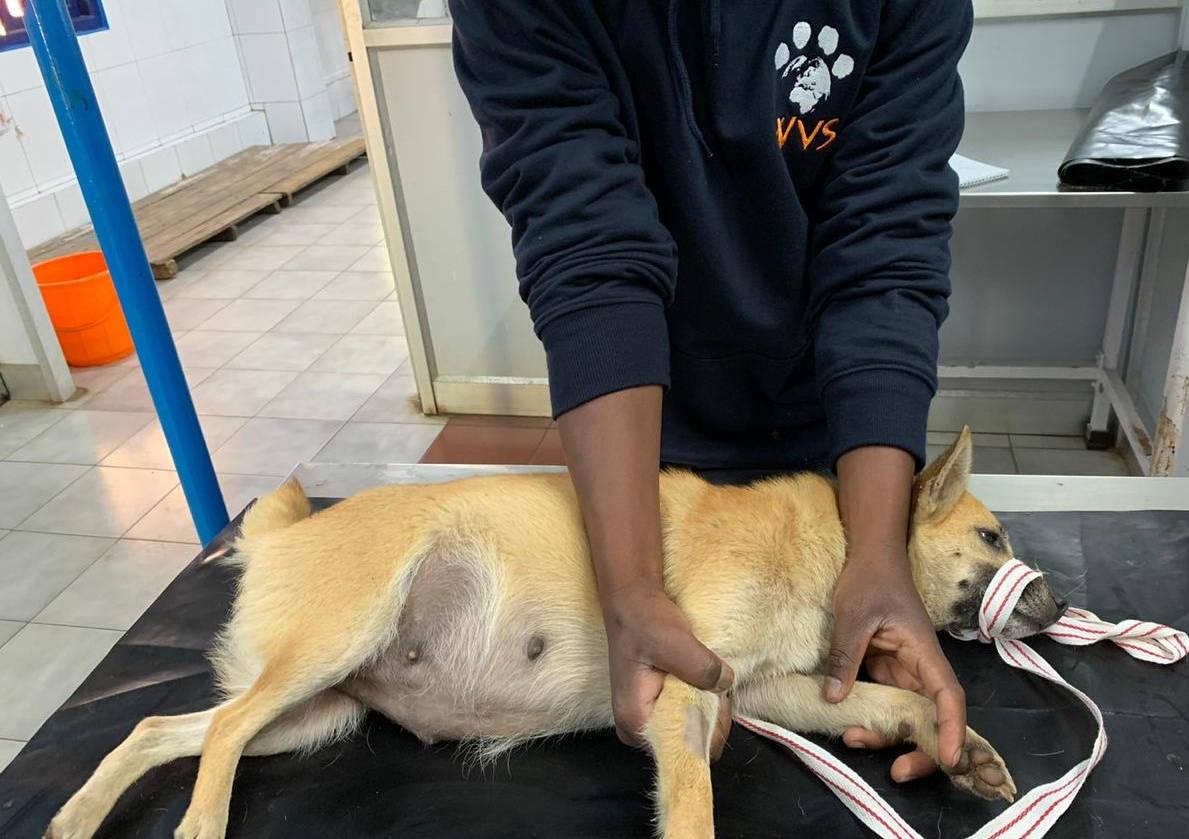
Restrain. Ensure the animal is properly restrained by an assistant (or is adequately sedated) (Figure 2).
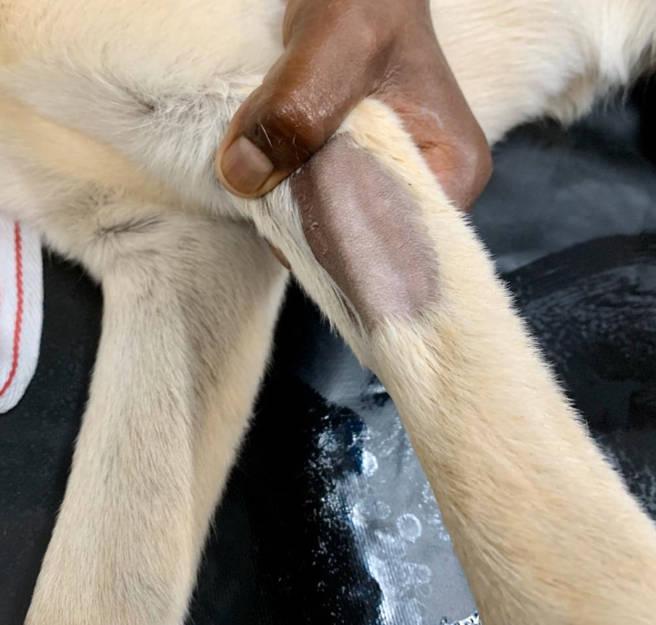
Site preparation. Prepare the catheter area aseptically. Shave the hair along the dorsal antibrachium, making sure to shave medial and lateral to aid identifying the vein.
Raise the vein. An assistant raises the vein. To do this they place a hand behind the dog's elbow to extend the forelimb and placing their thumb over the dorsal aspect of the proximal antibrachium (Figure 3). They should roll their thumb from medial to lateral to stabilise the vein on the dorsal aspect of the limb.
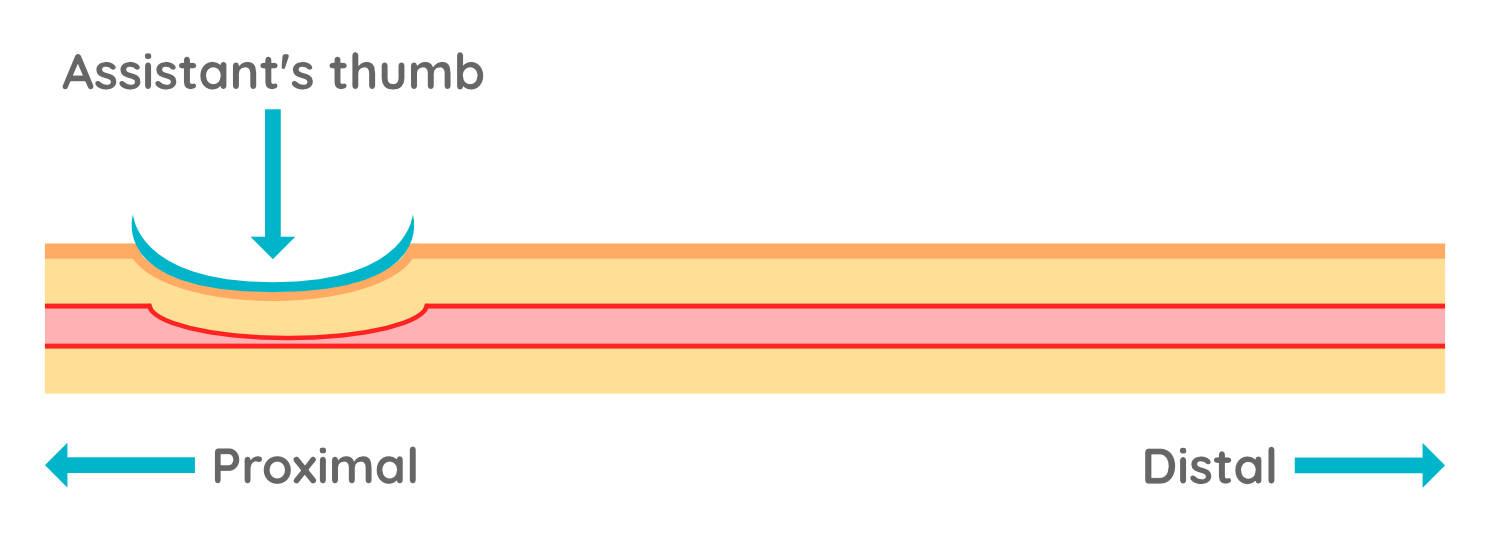
Palpate & visualise. Even in animals where the vein is clearly visible, it is a good habit to get into palpating the vein before attempting to place the catheter. Becoming familiar with what the vein feels like on palpation will enable you to identify veins even in overweight dogs where it cannot be visualised. Use the tip of one or two fingers to palpate the area from medial to lateral and back again. You will feel the raised vein as a bouncy structure which is different from muscle or fat. Once you have identified the vein on palpation, visualise the path of the vein within the leg and continue to palpate to confirm this path. Identify your point of entry as distal as possible so that further attempts higher up the vein are possible if needed.
Stabilise. Beneath the skin the vein is mobile! So much so that it can literally jump out of the way of your needle! Skills to stabilise the vein will help you to hit the mark. Use your non-dominant hand to stabilise the limb by holding the underside of the antibrachium. Now with your assistant holding the elbow and you holding the leg, you have a stable starting point to place the catheter. This hand can also gently grip from beneath, applying slight tension on the skin. This tightness in the skin prevents it from moving as you place your needle as well as helping to stabilise the vein - but be careful not to apply so much pressure that you flatten the vein!
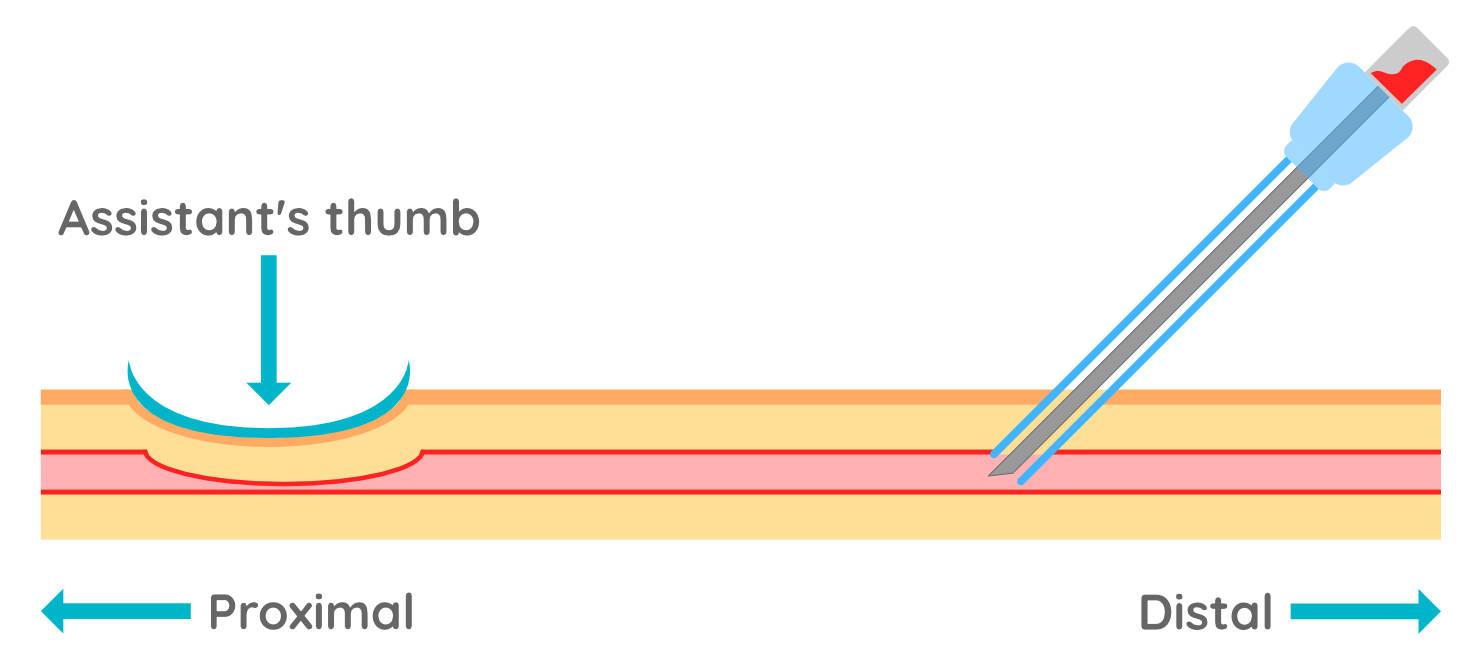
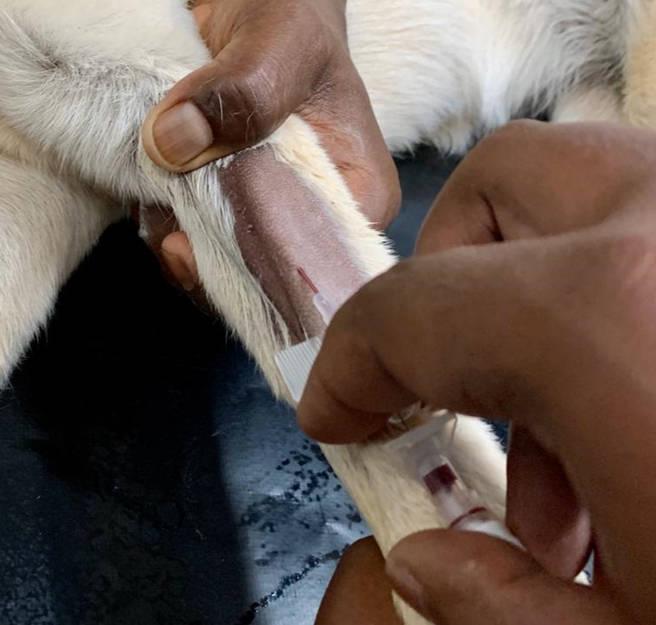
Skin. Before you enter the vein, you must first get through the skin. The skin is far thicker and tougher than the vessel wall, so you will need to gauge your pressure - too little and you won't get through, too much and your needle may go straight into the vein and out the other side. Perforating the skin is also the most painful part of the whole process and so conscious animals will often react to the initial needle prick, sometimes necessitating a repositioning by the person restraining. If you immediately pass through the skin into the vein and the animal moves, you risk blowing the vein. Therefore ideally you should aim to pass through the skin first, check the animal has not moved and then adjust the angle and pressure on your needle to enter the vein (Figure 4).
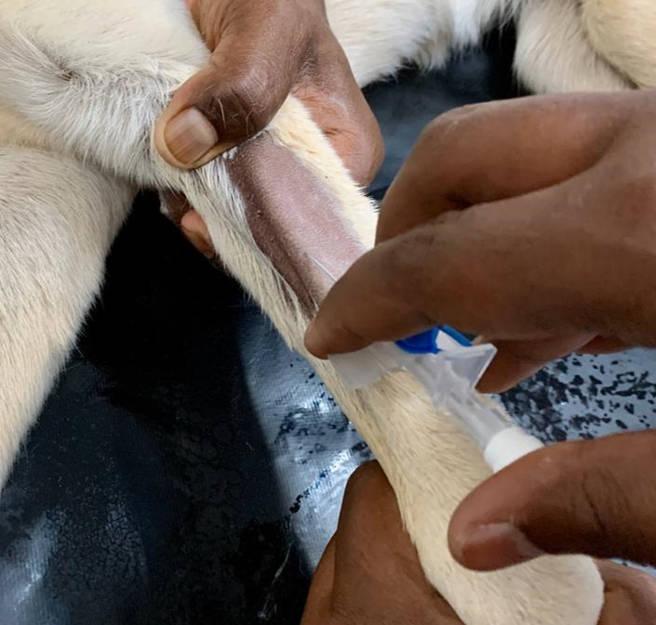
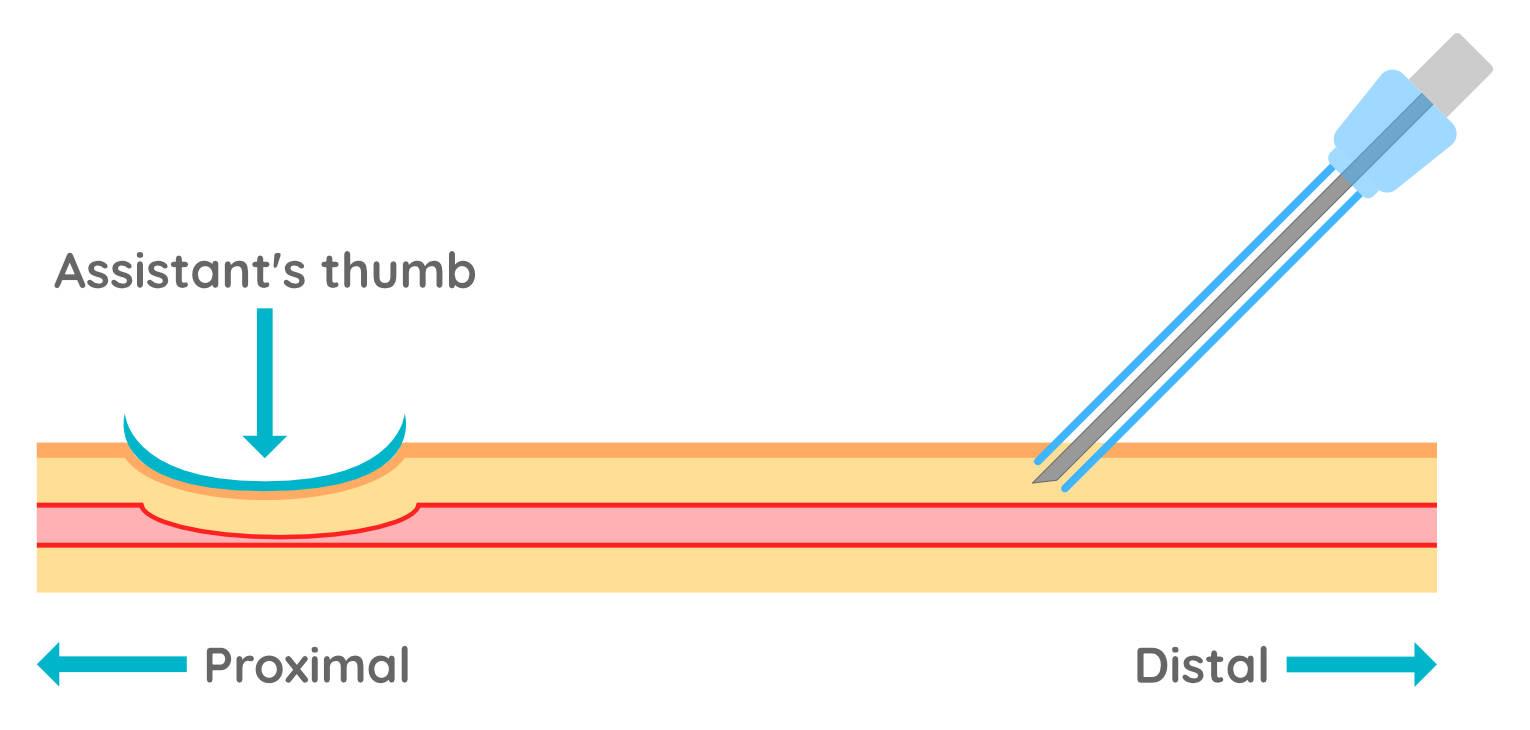
Flashback. Once you are through the skin direct your needle towards the vein, following its path. With the vein stabilised you should be able to gently advance your needle through the vessel wall whilst looking for blood in the catheter cap. Once you get a flashback of blood in the catheter hub you know you are in the vein (Figure 5). If this does not occur, gently reposition the catheter and try again without removing the needle from the skin - remember going through the skin is the painful bit!
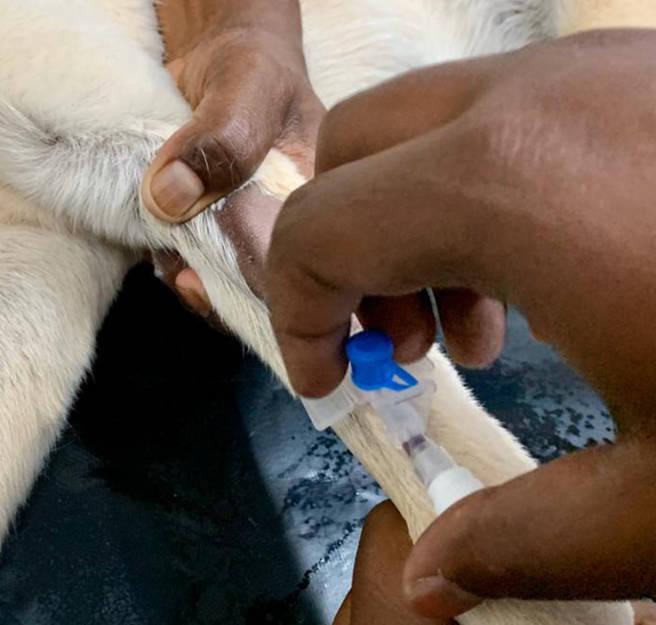
Are you a 'flicker' or a 'pusher'?
Advance the catheter. Now holding the needle stable within the vein, you need to advance the catheter sheath forward, off the needle, into the vein (Figure 6). People are commonly grouped into "pushers" and "flickers" - which are you? In both methods the needle hub needs to be held stable whilst the catheter is pushed forwards (advanced) into the vein. The 'flick' method stabilises the needle and advances the catheter with one hand; the thumb and second finger stabilise the needle hub, whilst advancing the catheter with the first finger. The 'push' method uses both hands, so the non-dominant hand stabilises the needle hub whilst the other hand pushes the catheter forward.
The catheter should always be pushed into the vein until the hub meets the skin, so that none of the white catheter tubing is visible outside of the skin.
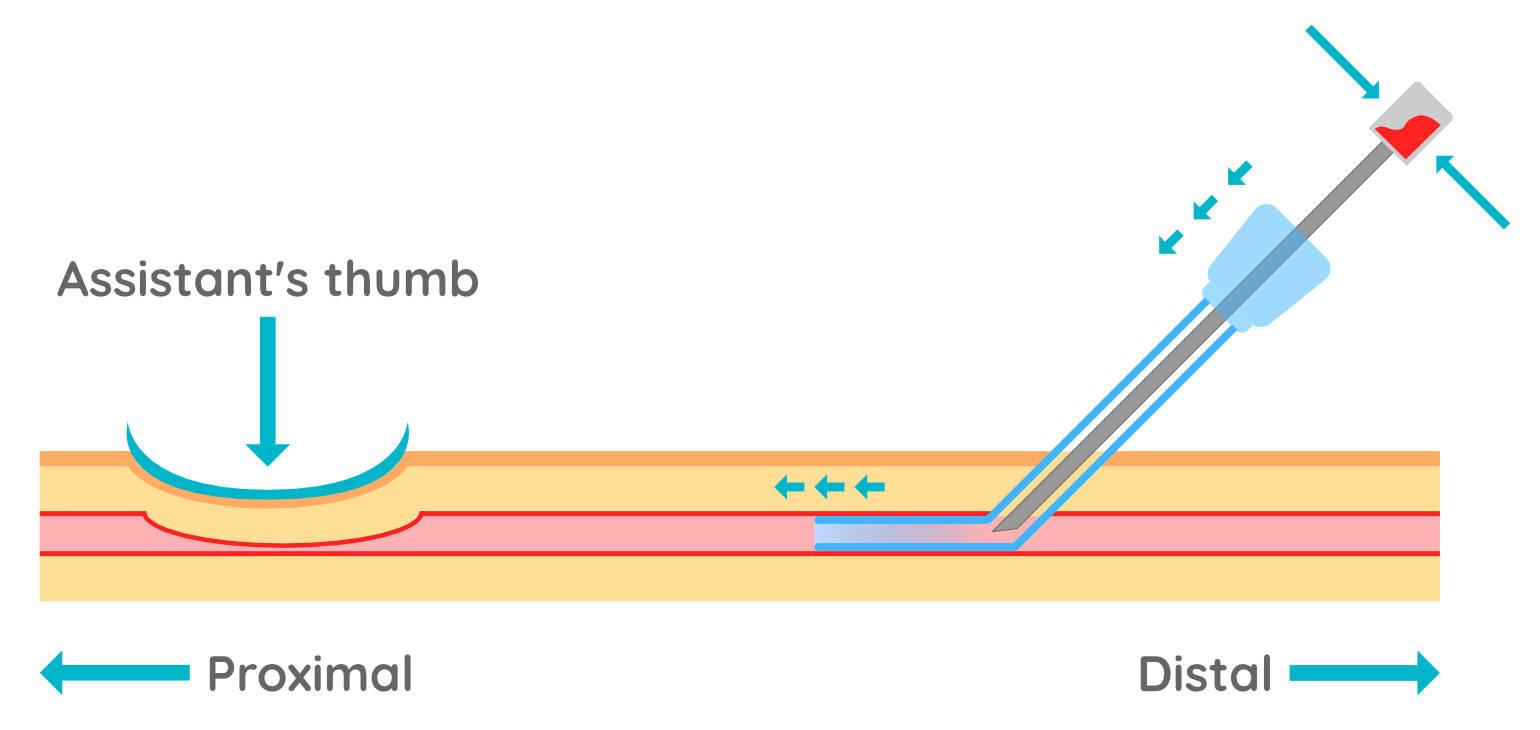
Remove stylet. Stop raising and ask your assistant to instead occlude the vein distal to the catheter hub whilst you remove the stylet (needle) (Figure 7). With the vein occluded at the point of the catheter, back-flow of blood should be minimal whilst you attach a bung or T-connector to the catheter hub.
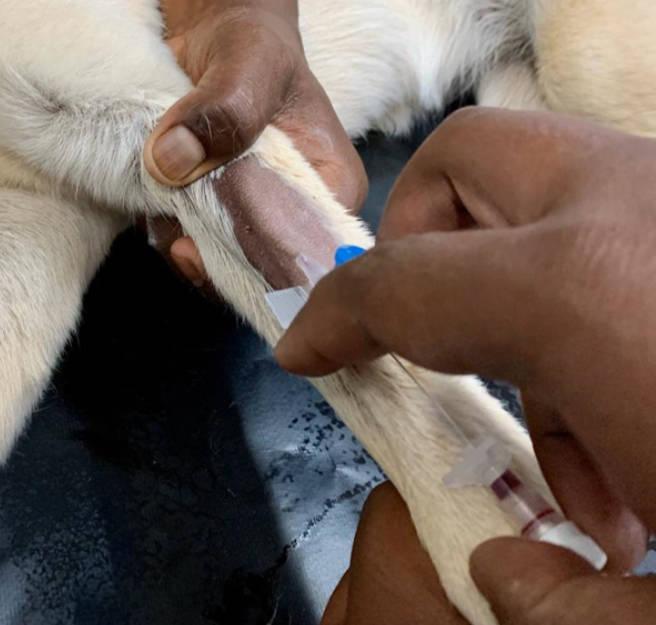
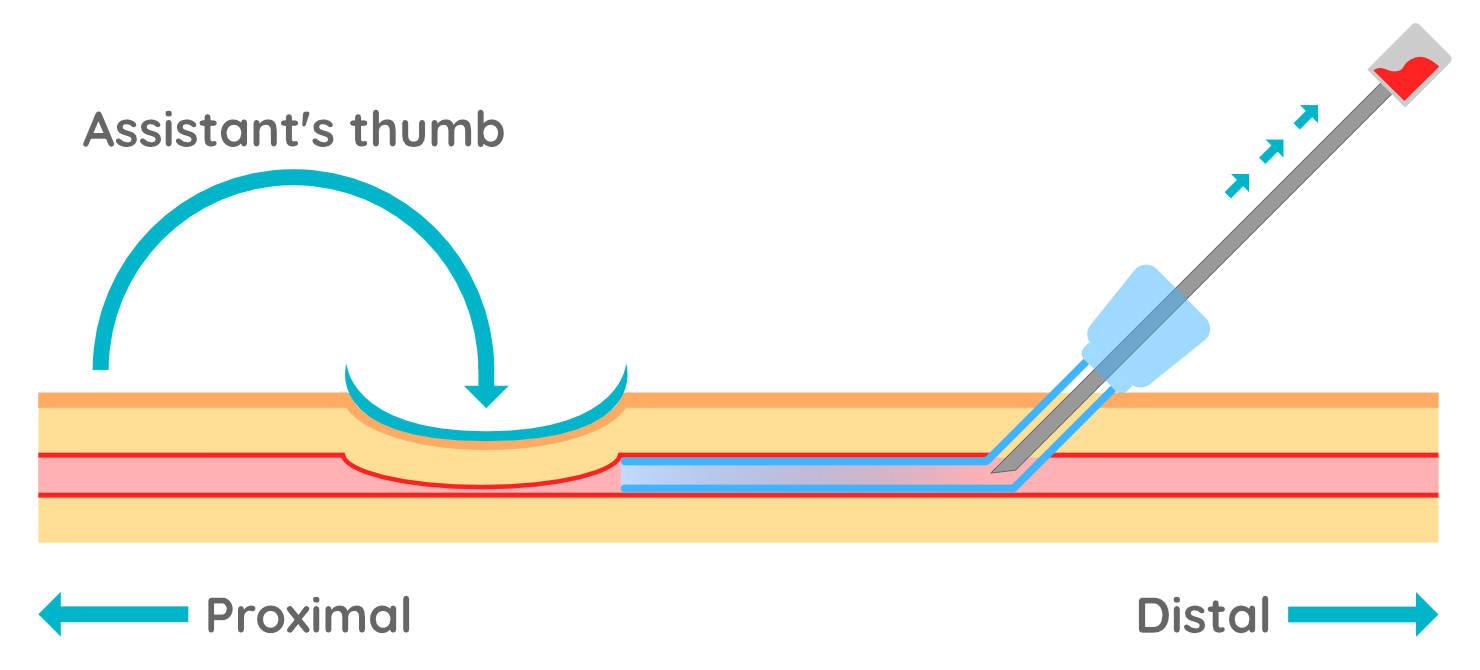
Tape. Place one piece of tape under the catheter hub, around the limb, and then over the hub (Figure 8). The tape must not be placed too tightly so as to restrict blood flow in the vein or the limb.
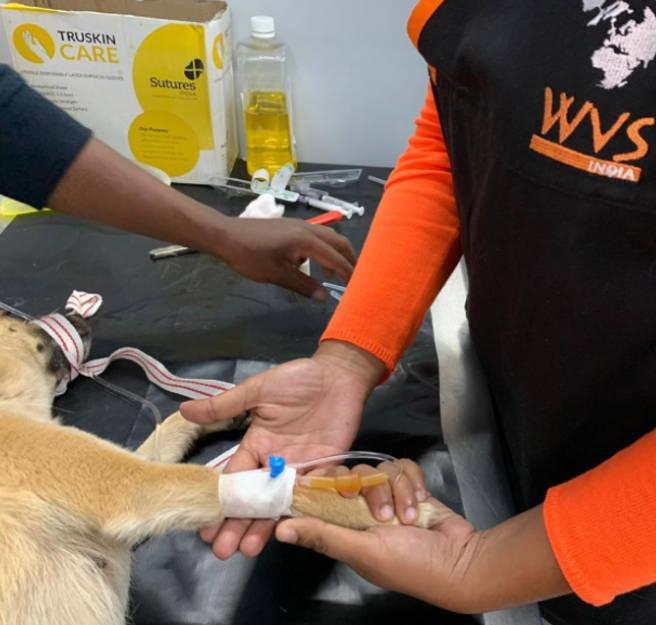
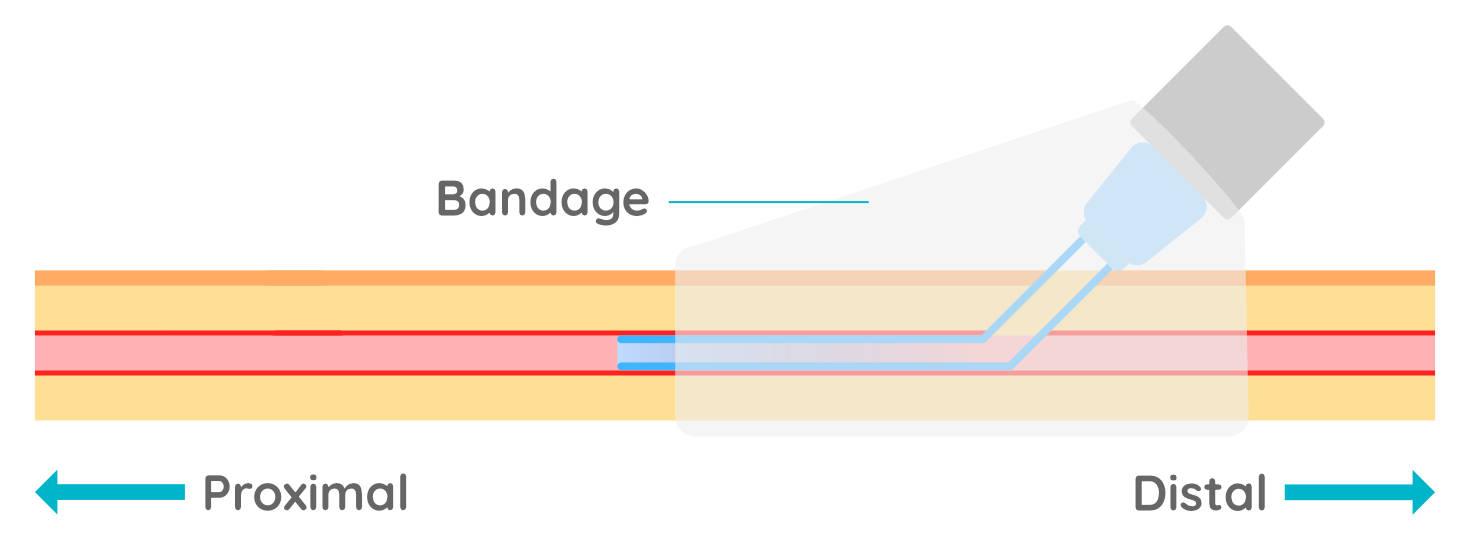
Flush. Finally, flush the catheter (through the T connector or injection cap) with heparinsed saline whilst palpating the vein to feel the fluid pass within the vein and ensue there is no subcutaneous swelling.
Bandage. For catheters left in place for in-patients, the site should be lightly bandaged with a U-bend in the line so that any tension on the line does not immediately pull on the catheter itself.
IV Catheter removal
When removing a catheter, first remove all tape and bandaging materials from around the catheter. Surgical spirit can be applied to tape to release the adhesive and make it easier to remove. Place a dry cotton swab over the catheter insertion point with one hand and apply gentle pressure whilst withdrawing the catheter. Maintain gentle pressure for one minute to help prevent the vein from blowing (extravasation of blood). The cotton swab can be held in place with tape for a short time, however avoid this in patients that are not easy to handle as it may be difficult to remove later.
Stray dogs should never be released with any tape around a limb as when wet this can roll into a tight band and cause serious injury.